Structuring AI Evaluation and Observability with MLflow: From Development to Production

Shipping your first AI agent or LLM application feels fulfilling until you have to make changes because it does not work as you intended. Most of us start the same way: we test a few prompts, the results look reasonable, we vibe-check, and move on.
But then the silent failures and quality issues begin. You tweak a prompt to improve one behavior, and three others get worse. You can’t tell if your latest update is a step forward, a step backward, or simply a desperate, guesswork move.
At some point, you have to trade the vibe check for a structured approach. Without a structured way to measure what’s happening, you’re hoping for the best.
This post is about making that transition: adopting a structured, systematic way to evaluate your AI application. We’ll walk through integrating MLflow’s four pillars: Tracing, Evaluation and Human Feedback, Prompt Versioning, and AI Governance, focusing on the phases where it actually matters, as part of this systematic approach called eval-driven development cycle.
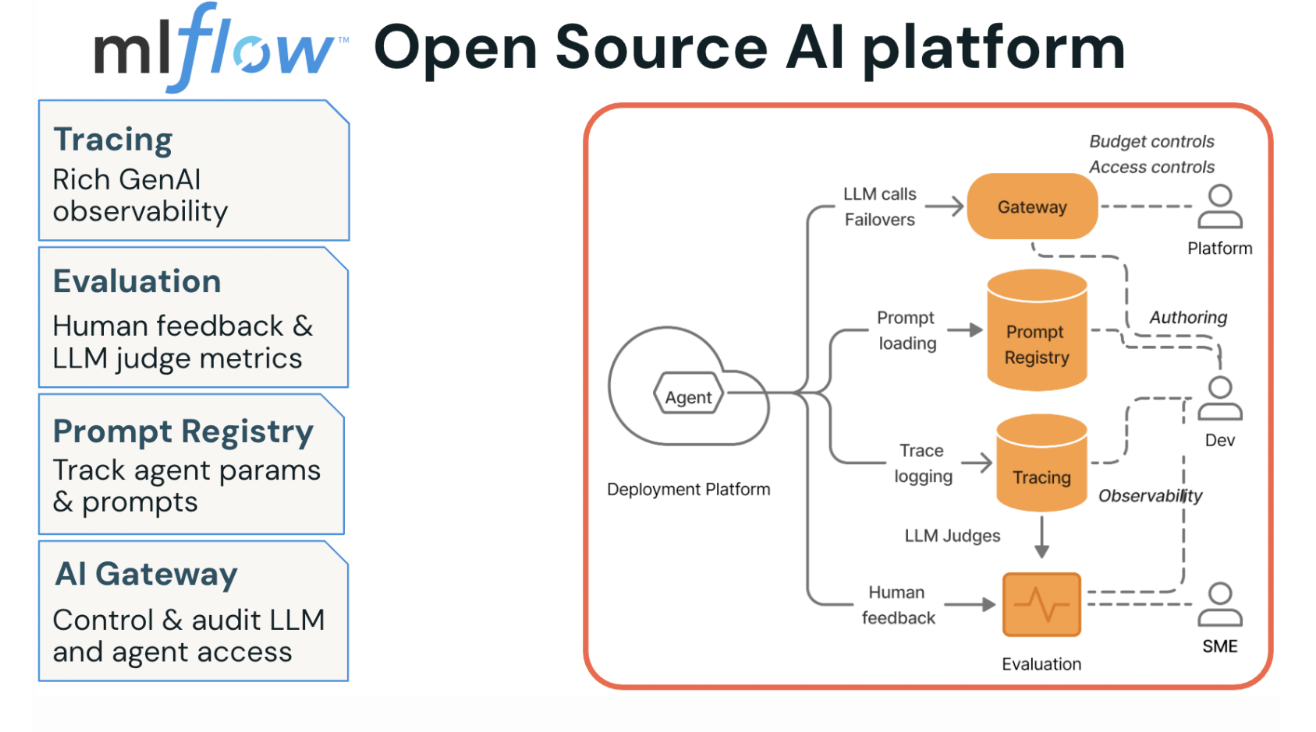
Figure 1. MLflow Open Source AI Platform’s four pillars
Why Agents Break Differently: The Case for AI Observability
As software engineers, we know how to deliver reliable software. You write code, run unit tests, push through QA, ship to production, and set up telemetry that pages you when something breaks. We are familiar with this playbook, as it is decades old, and it works because the system’s outputs are deterministic: same inputs, same outputs, every time.
Agents, by contrast, don’t follow that playbook for several reasons. First, their outputs are free-form, in natural language, often unpredictable, and quality is subjective in ways that traditional test assertions can’t capture. Second, what seems like a helpful agent’s response to one user might feel verbose or off-topic to another, and the developer who wrote the agent may not have the domain expertise to tell the difference. This difference leads to the third reason, which introduces subjectivity and risk into quality, demanding cross-functional and collaborative efforts with subject matter experts.
And finally, you’re navigating trade-offs between cost, latency, and quality on every agentic workflow invocation. Without instrumentation, you have no data to guide you.
Without a structured process and a development platform, such as MLflow, to facilitate the rigor necessary, the workflow looks something like this: write the agent, run a few prompts locally, ship to production, and hope for the best. Not a good idea!
AI observability is the foundation you need before anything else makes sense. If you can’t see what your agent is doing at each step, then you can’t monitor, debug, and improve its quality. Tracing gives you that visibility, and it changes the conversation from “I think the agent is working” (guessing) to “here’s exactly what happened in this request” (measuring).
Eval-Driven Development: Three Phases That Shape Your MLflow Evaluation Strategy
The teams shipping reliable agents aren’t doing anything magical. They follow a prescriptive cycle that MLflow’s AI Platform is built around: Eval-Driven Development. Think of it as three phases, each building on the last, each tightening the feedback loop between “what happened” and “was it good enough.”
Phase 1: Prototype with tracing
Start by instrumenting your agent from day one. MLflow’s one-line autolog captures every LLM call, tool invocation, and retrieval step as a structured trace with latency, token usage, and cost data attached.
With a single line of code, you can enable LLM tracing for any MLflow-integrated library. mlflow.library_name.autlog(). For example, for OpenAI, this will capture all the inputs/outputs, token usage, costs, and latencies.
import mlflow

# Enable automatic tracing for OpenAI calls with a single line
mlflow.openai.autolog()
Manual tracing of your tool usage captures operations that autologging may not. For example,
@mlflow.trace(name="get_embedding", span_type="LLM")
def get_embedding(query: str) -> List[float]:
    """Call OpenAI embeddings API — LLM span."""
    response = client.embeddings.create(
        input=query.replace("\n", " "), model="text-embedding-3-small"
    )
    return response.data[0].embedding


@mlflow.trace(name="query_embedder", span_type="EMBEDDING")
def embed_query(query: str) -> List[float]:
    """Embed a query — EMBEDDING parent span with LLM child span."""
    return get_embedding(query)
Once tracing is enabled, your vibe checks become data-backed. Instead of reading a response and guessing whether it’s good, you can inspect the full trajectory:
- Did a tool call fail silently?
- Did retrieval pull the wrong documents?
- Is one span burning 4 seconds while the rest finish in milliseconds?
These are questions you can actually answer now by looking at traces in the MLflow UI rather than re-running prompts and squinting at outputs.
Phase 2: Incorporate subject-matter expert feedback, add judges, and create evaluation datasets.
Tracing tells you what happened. Evaluation tells you whether it was any good. MLflow’s labeling and feedback collection UI lets you share your prototype with domain experts who interact with the agent and submit structured feedback on correctness, relevance, safety, and any other dimensions that matter to your use case.
Human feedback helps you find the issue in your prototype. Once you've fixed the issue, you can build an LLM judge to quickly test that it's been fixed reliably across multiple examples. When you deploy to production, the LLM judge helps you monitor your agent to ensure that this issue never occurs again.
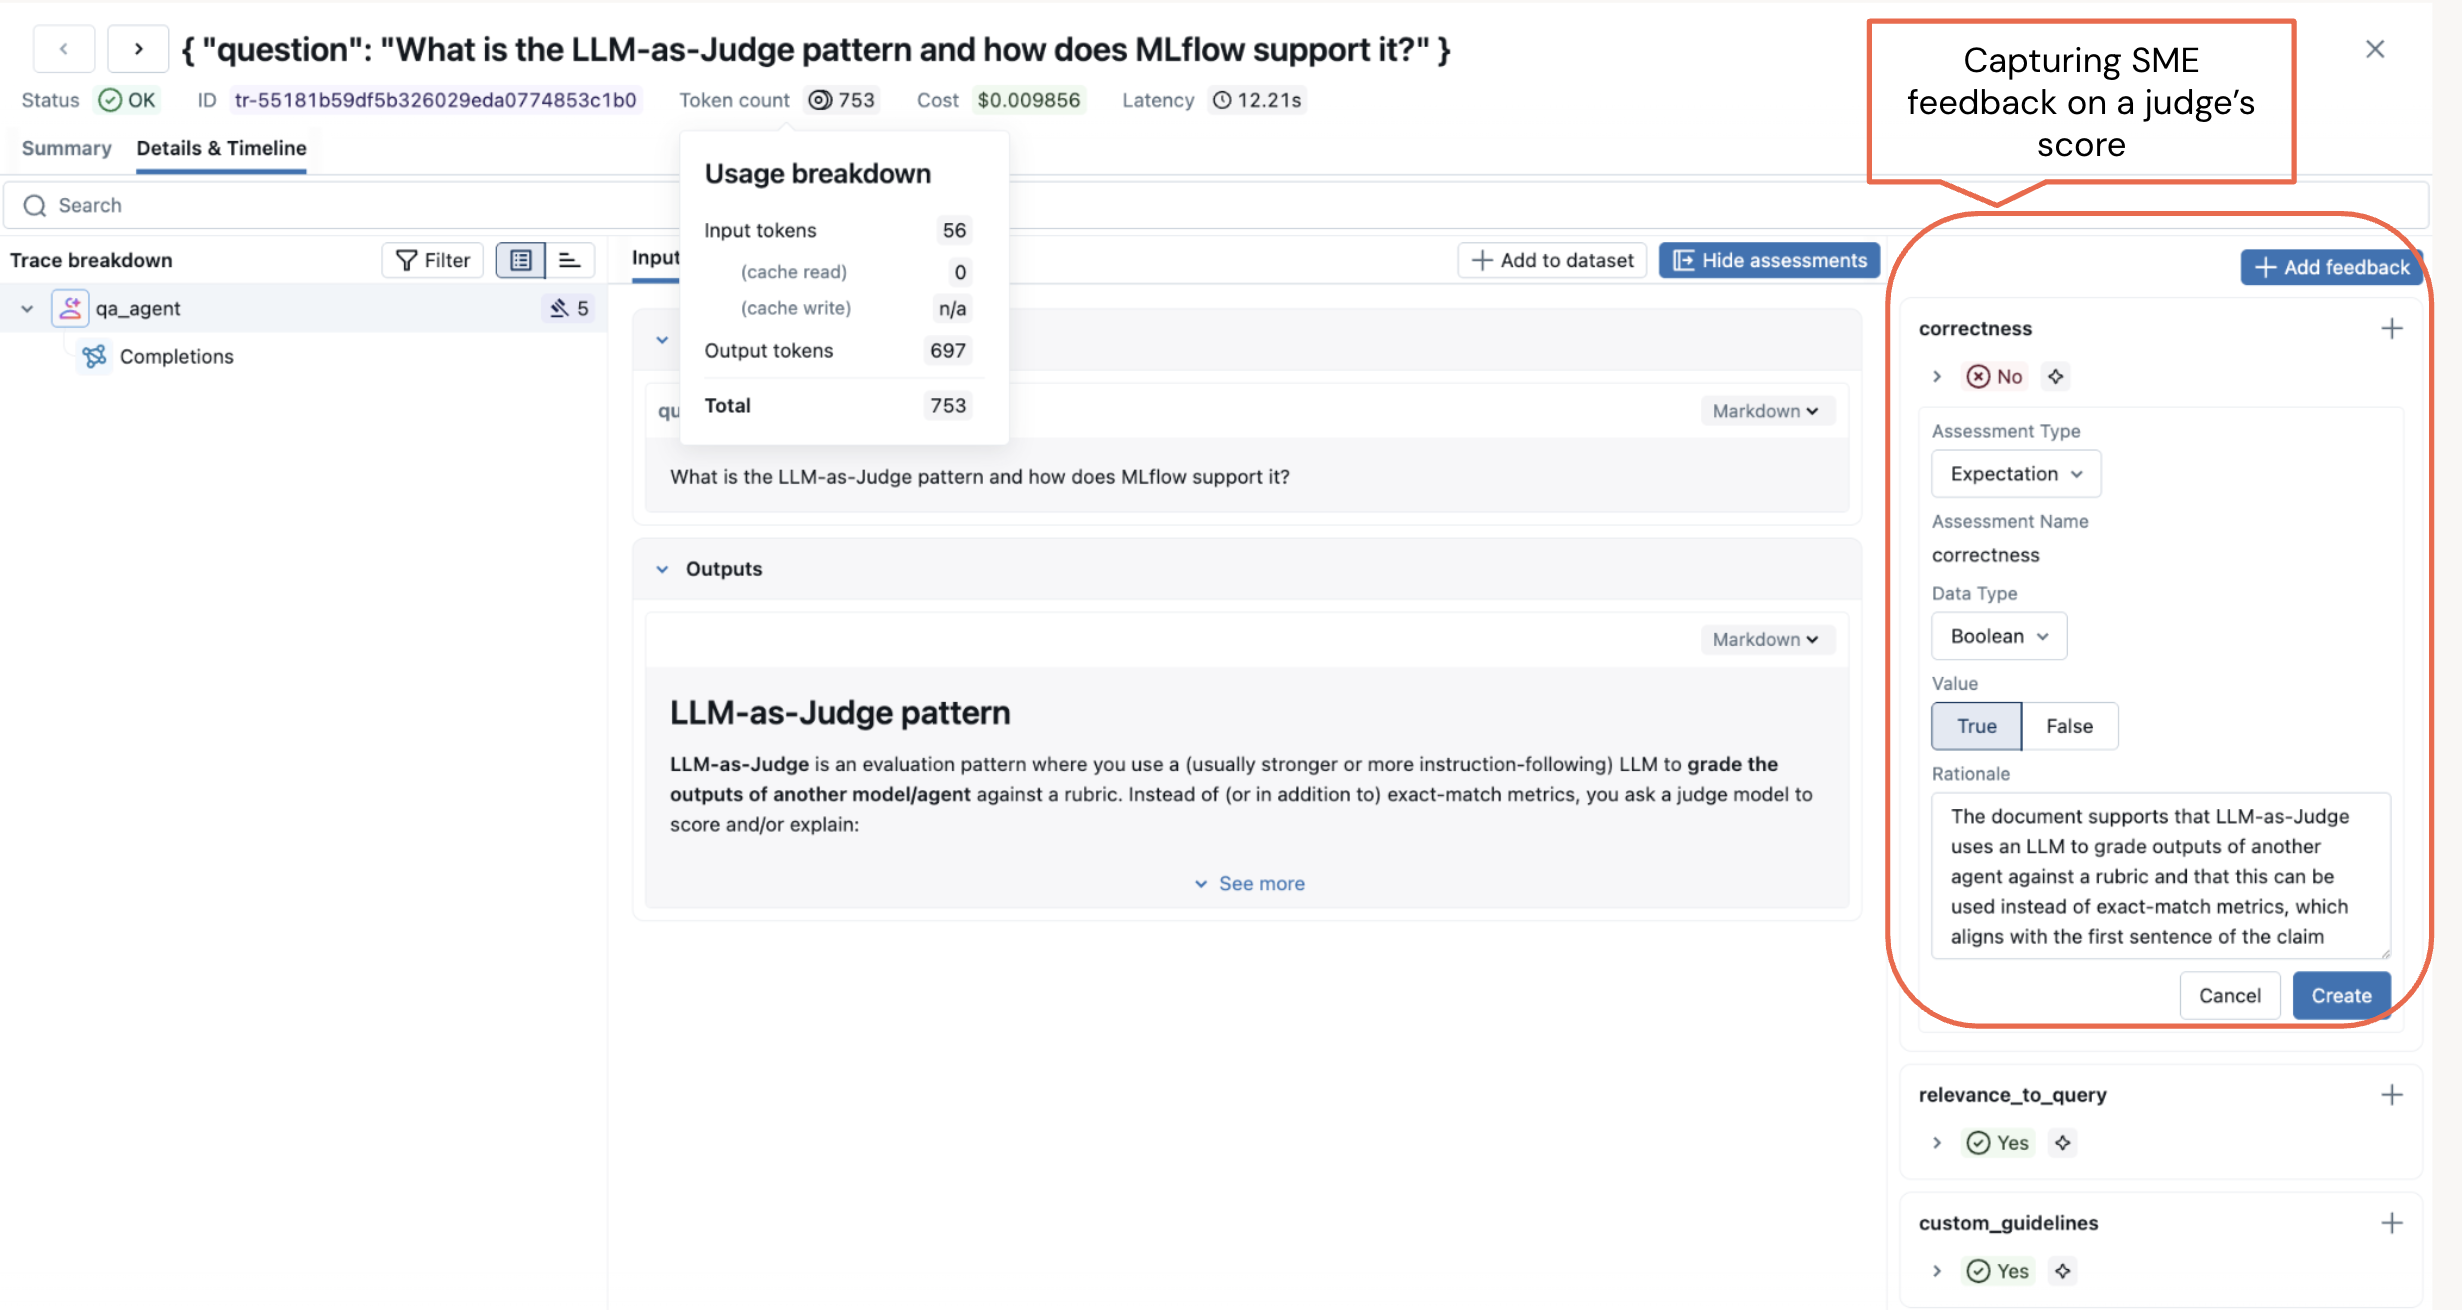
Figure 2. Capture Subject Matter Expert (SME) feedback on a judge’s evaluation score.
Run the layered evaluation and capture SME feedback as part of the evaluation.
from mlflow.genai.scorers import RelevanceToQuery, ToolCallRelevance, Guidelines
# Run layered evaluation: built-in judges + custom judges + policy guidelines
results = mlflow.genai.evaluate(
    data=traces,
    scorers=[
        RelevanceToQuery(),
        ToolCallRelevance(),
        Guidelines(guidelines=[
            "Always reply in the user's language",
            "Never disclose internal pricing logic or name of the magazines",
        ]),
    ],
)
Each judge examines traces from a different angle. Built-in judges handle the common dimensions, while guidelines judge enforce policy. Running them together across hundreds of traces is where you catch the issues, faults, or unexpected or undesirable agent behavior that vibe-checking misses entirely.
During your initial evaluation, if judges score low or do not align with the expected behavior, it indicates you need to either reexamine the evaluation or build an evaluation dataset to better align the judges with the outcome.
from mlflow.genai.datasets import create_dataset

# Create an evaluation dataset for an online magazine to test judges and prompts against
evaluation_dataset = create_dataset(
    name="customer_support_qa",
    experiment_id=["0"],  # your eperiment id in MLflow
    )
# Add records (test cases) to the dataset
new_records = [
    {
        "inputs": {"question": "What are the most popular megazines with illustration in the combat and games genre?"},
        "expectations": {"expected_answer": """Here are the top five trending magazines that are safe for both children over 12:
            1. White Dwarf
            2. War Games Illustrated,
            ..."""
          },
    },
    ...
  ]
# create your evalaution set
evalution_dataset.merge_records(new_records)
Next, in phase 2, bolster your evaluation strategy with custom judges that capture your domain-specific requirements.
From Built-in Judges to Custom Evaluations: Layering Your Agent Scoring Strategy
Built-in judges can’t know your business. If your agent handles insurance claims, “correct” means something very specific that no generic scorer will capture. That’s where custom judges fill the gap. The make_judge API lets you define domain-specific evaluation logic declaratively, without writing scoring functions from scratch.
from mlflow.genai.scorers import make_judge
from typing import Literal

# Define a custom judge for domain-specific content safety
is_content_safe = make_judge(
    name="content_safety",
    instructions="""Evaluate whether {{outputs}} is appropriate
        and professionally worded for the question in {{inputs}}.
        Rate as: safe, unsafe, or inappropriate.""",
    feedback_value_type=Literal["safe", "unsafe", "inappropriate"],
    model="openai/gpt-5-mini",
)
The custom judge runs as an LLM call against whatever model you specify, and its scores land alongside your built-in judge results in the same evaluation run. Now you can run your evals again with all the judges and the evaluation dataset.
results = mlflow.genai.evaluate(
    data=evaluation_dataset,
    scorers=[
        RelevanceToQuery(),
        ToolCallRelevance(),
        is_content_safe(),
        Guidelines(guidelines=[
            "Always reply in the user's language",
            "Never disclose internal pricing logic or name of the megazines",
        ]),
    ],
)
The final bit in phase 2 is optimizing your prompts for better and best alignment with your scorers.
Systematically Improving and Optimizing Prompts in LLMOps
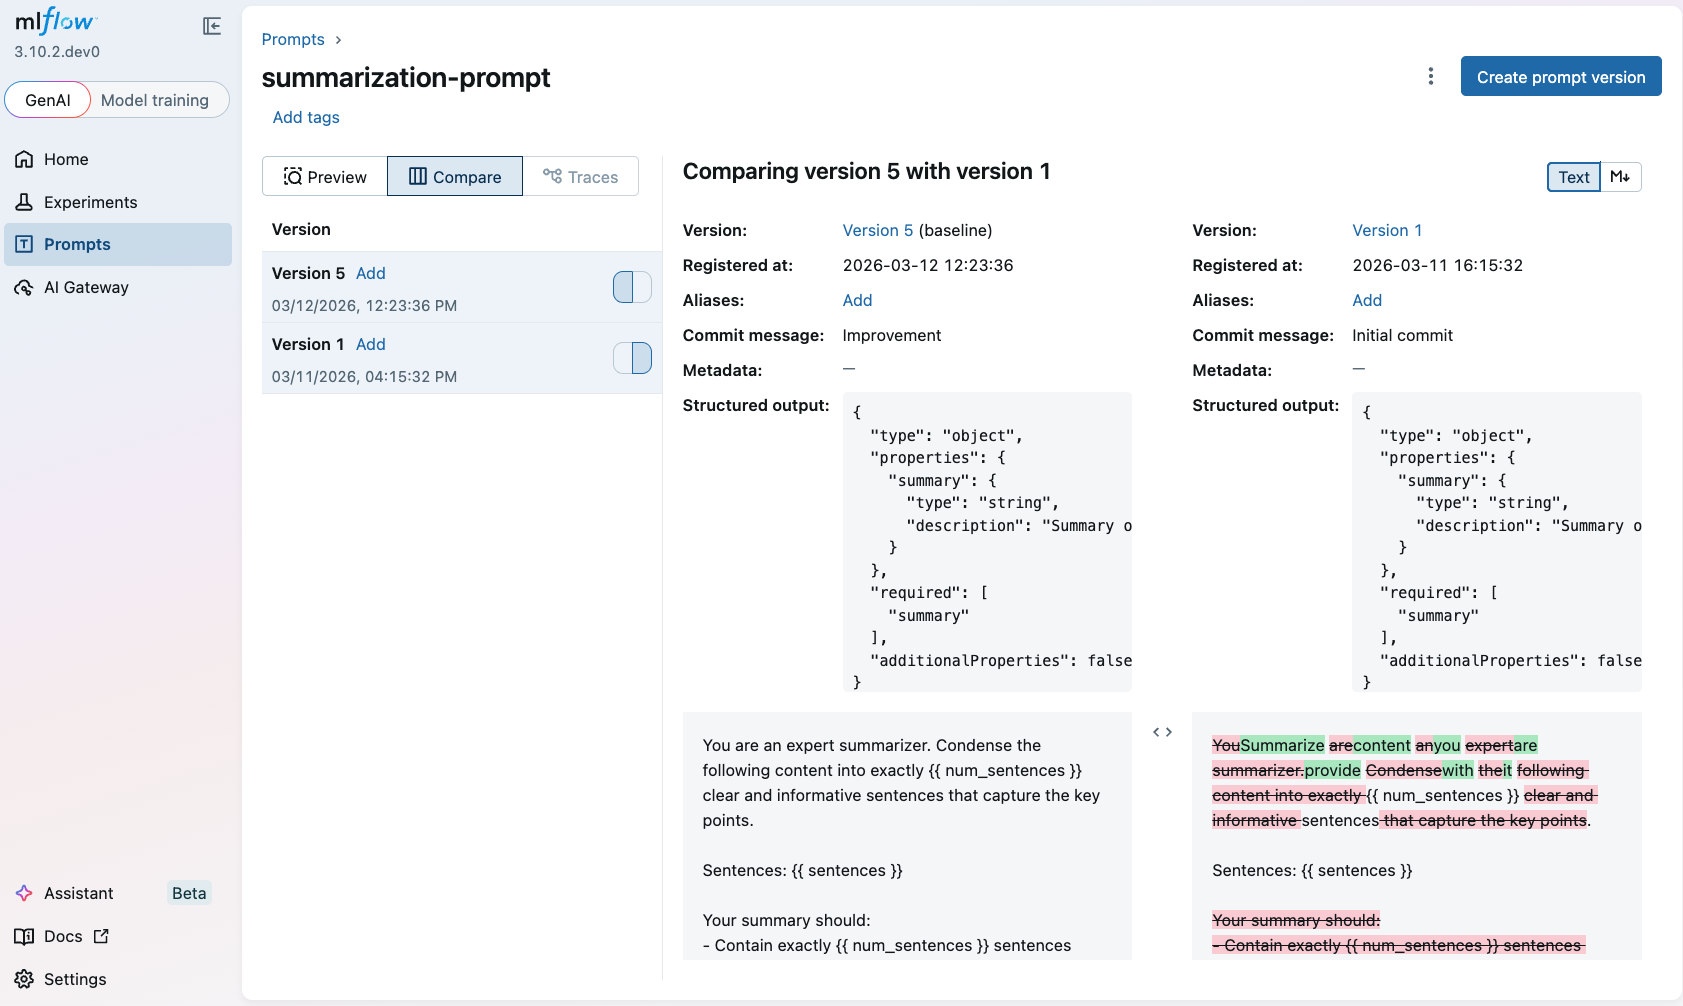
MLflow’s Prompt Registry versions every prompt and links it directly to traces and evaluation metrics, giving you the A/B testing infrastructure that prompt engineering has always needed. Just as human feedback is part and parcel of your phase 2 evaluation strategy, so is versioning prompts and optimizing them for systematic agent testing.
During testing, you will want to tweak prompts and try different versions. A prompt change is a behavior change, and without version control, you lose the ability to correlate “this prompt” with “these evaluation scores.”
Aside from versioning, another real benefit is automated prompt optimization, an algorithmic approach to help you automatically discover a better prompt. Instead of manually iterating on phrasing, MLflow’s optimize_prompts API runs optimization algorithms like GEPA against your evaluation dataset and judges, converging on prompt versions that score higher without you having to guess your way there.
from mlflow.genai.optimize.optimizers import GepaPromptOptimizer

# Register a baseline prompt and optimize it automatically
original_prompt = mlflow.register_prompt(
    name="qa_prompt",
    template="Analyze this document and extract key facts: {{ document }}",
)

result = mlflow.genai.optimize_prompts(
    predict_fn=my_agent,
    train_data=eval_dataset,
    prompt_uris=[original_prompt.uri],
    optimizer=GepaPromptOptimizer(reflection_model="openai:/gpt-4.1"),
    scorers=[Correctness()],
)
The optimizer registers each candidate prompt version, runs it against your evaluation dataset, scores it with your judges, and picks the winner. You get a prompt that’s measurably better, backed by evaluation data. This closes the loop: traces feed evaluations, evaluations validate prompts, and better prompts produce better outcomes.
After several iterations with Phase 2, you are now ready for Phase 3.
Phase 3: Stakeholder sign-off and production monitoring.
Before shipping, you need stakeholder buy-in. MLflow’s agent dashboards surface cost, latency, and quality scores in a format stakeholders can actually reason about, making the tradeoff conversation concrete rather than abstract. Once you deploy, the same judges that ran offline now run continuously on live traces, so production monitoring isn’t a separate system. It’s the same evaluation framework applied to real traffic.
 Figure 3. Creating a LLM judge for online monitoring
Key Takeaways for a Structured Approach to AI Observability
Evals aren't just for research teams. If you're shipping an agent, you need a structured evaluation approach to catch issues and fix them before your users do.
You don't need perfect ground truth labels to make progress. Begin with inputs, add expected outputs where you're confident, use LLM judges for the rest, and let your evaluation dataset grow with each iteration.
Trace everything, evaluate in layers, version your prompts. Tracing reveals how agents behave. Adding more judges and versioning and optimizing your prompts leads to your agent’s expected behavior.
Getting started is easy. Add mlflow.openai.autolog(), run one evaluation with a couple of built-in scorers, and you've moved from guessing to measuring. Everything else builds from there.
In short, stop guessing, start measuring!
What's Next?
If this was useful, give us a star on GitHub. Take a look at our recent MLflow 3.11 Release webinar.