Evaluating Prompts
Prompts are the core components of GenAI applications. However, iterating over prompts can be challenging because it is hard to know if the new prompt is better than the old one. MLflow provides a framework to systematically evaluate prompt templates and track performance over time.
Workflow
Create prompt template(s)
Define and register your prompt templates in MLflow Prompt Registry for version control and easy access.
Prepare evaluation dataset
Create test cases with inputs and expected outcomes to systematically evaluate prompt performance.
Define a wrapper function to generate responses
Wrap your prompt in a function that takes dataset inputs and generates responses using your model.
Define evaluation scorers
Set up built-in and custom scorers to measure quality, accuracy, and task-specific criteria.
Run evaluation
Execute the evaluation and review results in MLflow UI to analyze performance and iterate.
Example: Evaluating a Prompt Template
Prerequisites
First, install the required packages by running the following command:
pip install --upgrade mlflow>=3.3 openai
MLflow stores evaluation results in a tracking server. Connect your local environment to the tracking server by one of the following methods.
- Local (pip)
- Local (docker)
- Remote MLflow Server
- Databricks
For the fastest setup, you can install the mlflow Python package and run MLflow locally:
mlflow ui --backend-store-uri sqlite:///mlflow.db --port 5000
This will start the server at port 5000 on your local machine. Connect your notebook/IDE to the server by setting the tracking URI. You can also access to the MLflow UI at http://localhost:5000.
import mlflow

mlflow.set_tracking_uri("http://localhost:5000")
You can also brows the MLflow UI at http://localhost:5000.
MLflow provides a Docker Compose file to start a local MLflow server with a postgres database and a minio server.
git clone https://github.com/mlflow/mlflow.git
cd docker-compose
cp .env.dev.example .env
docker compose up -d
This will start the server at port 5000 on your local machine. Connect your notebook/IDE to the server by setting the tracking URI. You can also access to the MLflow UI at http://localhost:5000.
import mlflow

mlflow.set_tracking_uri("http://localhost:5000")
Refer to the instruction for more details, e.g., overriding the default environment variables.
If you have a remote MLflow tracking server, configure the connection:
import os
import mlflow

# Set your MLflow tracking URI
os.environ["MLFLOW_TRACKING_URI"] = "http://your-mlflow-server:5000"
# Or directly in code
mlflow.set_tracking_uri("http://your-mlflow-server:5000")
If you have a Databricks account, configure the connection:
import mlflow

mlflow.login()
This will prompt you for your configuration details (Databricks Host url and a PAT).
If you are unsure about how to set up an MLflow tracking server, you can start with the cloud-based MLflow powered by Databricks: Sign up for free →
Step 1: Create prompt templates
Let's define a simple prompt template to evaluate. We use MLflow Prompt Registry to save the prompt and version control it, but it is optional for evaluation.
import mlflow

# Define prompt templates. MLflow supports both text and chat format prompt templates.
PROMPT_V1 = [
    {
        "role": "system",
        "content": "You are a helpful assistant. Answer the following question.",
    },
    {
        "role": "user",
        # Use double curly braces to indicate variables.
        "content": "Question: {{question}}",
    },
]

# Register the prompt template to the MLflow Prompt Registry for version control
# and convenience of loading the prompt template. This is optional.
mlflow.genai.register_prompt(
    name="qa_prompt",
    template=PROMPT_V1,
    commit_message="Initial prompt",
)
Step 2: Create evaluation dataset
The evaluation dataset is defined as a list of dictionaries, each with an inputs and expectations field.
eval_dataset = [
    {
        "inputs": {"question": "What causes rain?"},
        "expectations": {
            "key_concepts": ["evaporation", "condensation", "precipitation"]
        },
    },
    {
        "inputs": {"question": "Explain the difference between AI and ML"},
        "expectations": {
            "key_concepts": ["artificial intelligence", "machine learning", "subset"]
        },
    },
    {
        "inputs": {"question": "How do vaccines work?"},
        "expectations": {"key_concepts": ["immune", "antibodies", "protection"]},
    },
]
Step 3: Create prediction function
Now wrap the prompt template in a simple function that takes a question to generate responses using the prompt template. IMPORTANT: The function must take the keyword arguments used in the inputs field of the dataset. Therefore, we use question as the argument of the function here.
from openai import OpenAI

client = OpenAI()


@mlflow.trace
def predict_fn(question: str) -> str:
    prompt = mlflow.genai.load_prompt("prompts:/qa_prompt/latest")
    rendered_prompt = prompt.format(question=question)

    response = client.chat.completions.create(
        model="gpt-4.1-mini", messages=rendered_prompt
    )
    return response.choices[0].message.content
Step 4: Define task-specific scorers
Finally, let's define a few scorers that decide the evaluation criteria. Here we use two types of scorers:
- Built-in LLM scorers for evaluating the qualitative aspects of the response.
- Custom heuristic scorer for evaluating the coverage of the key concepts.
from mlflow.entities import Feedback
from mlflow.genai import scorer
from mlflow.genai.scorers import Guidelines

# Define LLM scorers
is_concise = Guidelines(
    name="is_concise", guidelines="The response should be concise and to the point."
)
is_professional = Guidelines(
    name="is_professional", guidelines="The response should be in professional tone."
)


# Evaluate the coverage of the key concepts using custom scorer
@scorer
def concept_coverage(outputs: str, expectations: dict) -> Feedback:
    concepts = set(expectations.get("key_concepts", []))
    included = {c for c in concepts if c.lower() in outputs.lower()}
    return Feedback(
        value=len(included) / len(concepts),
        rationale=(
            f"Included {len(included)} out of {len(concepts)} concepts. Missing: {concepts - included}"
        ),
    )
LLM scorers use OpenAI's GPT 4.1-mini by default. You can use different models by passing the model parameter to the scorer constructor.
Step 5: Run evaluation
Now we are ready to run the evaluation!
mlflow.genai.evaluate(
    data=eval_dataset,
    predict_fn=predict_fn,
    scorers=[is_concise, is_professional, concept_coverage],
)
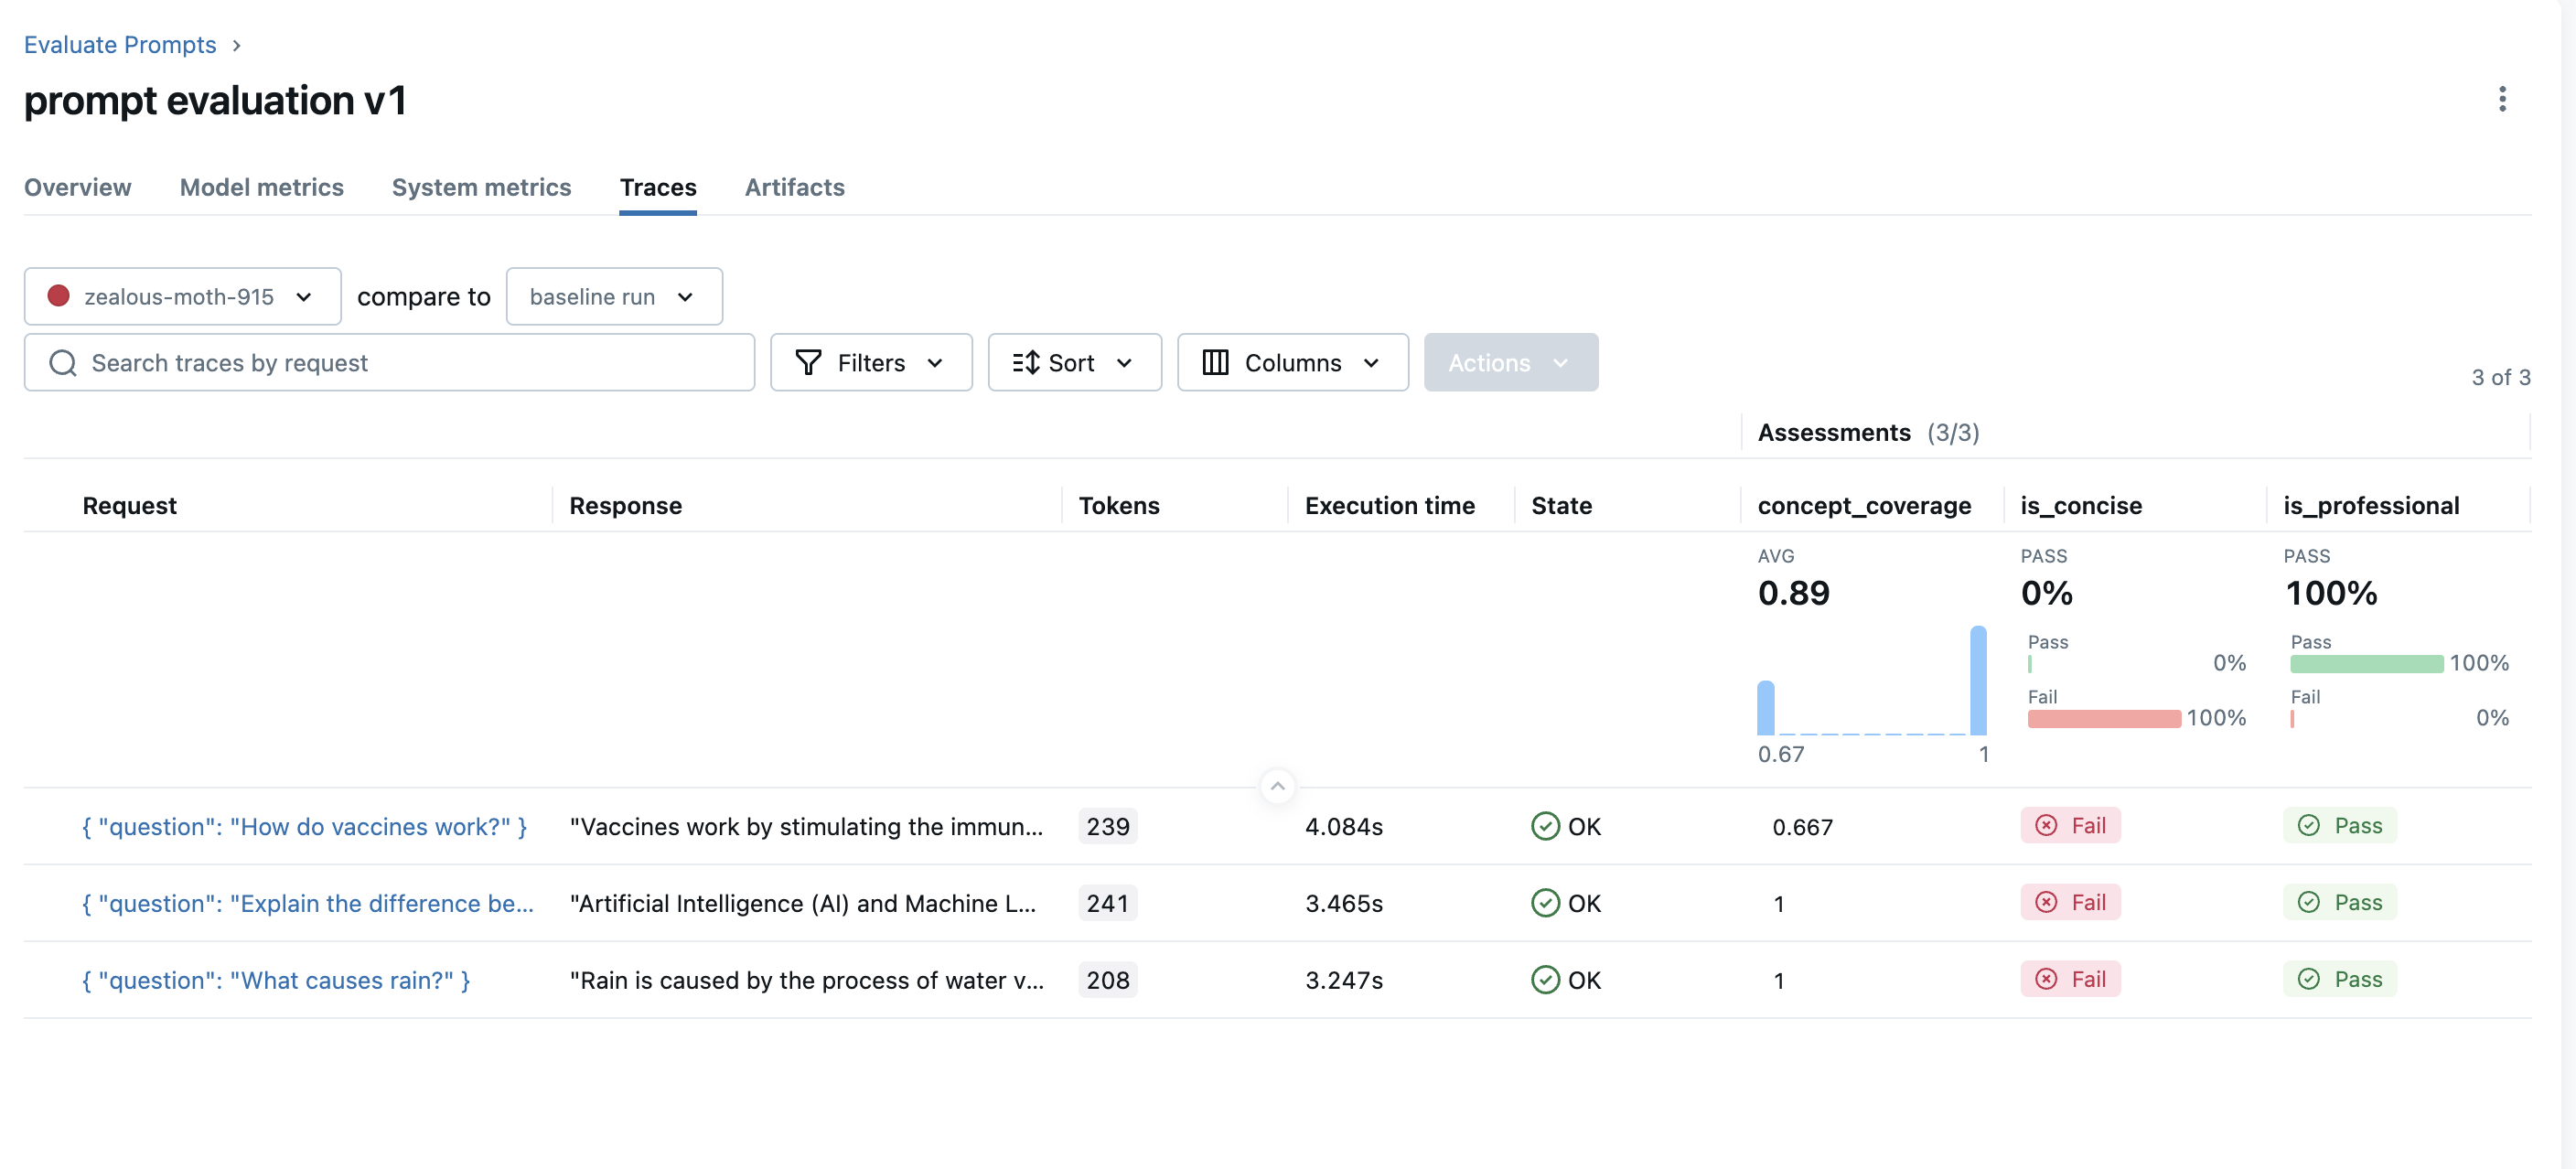
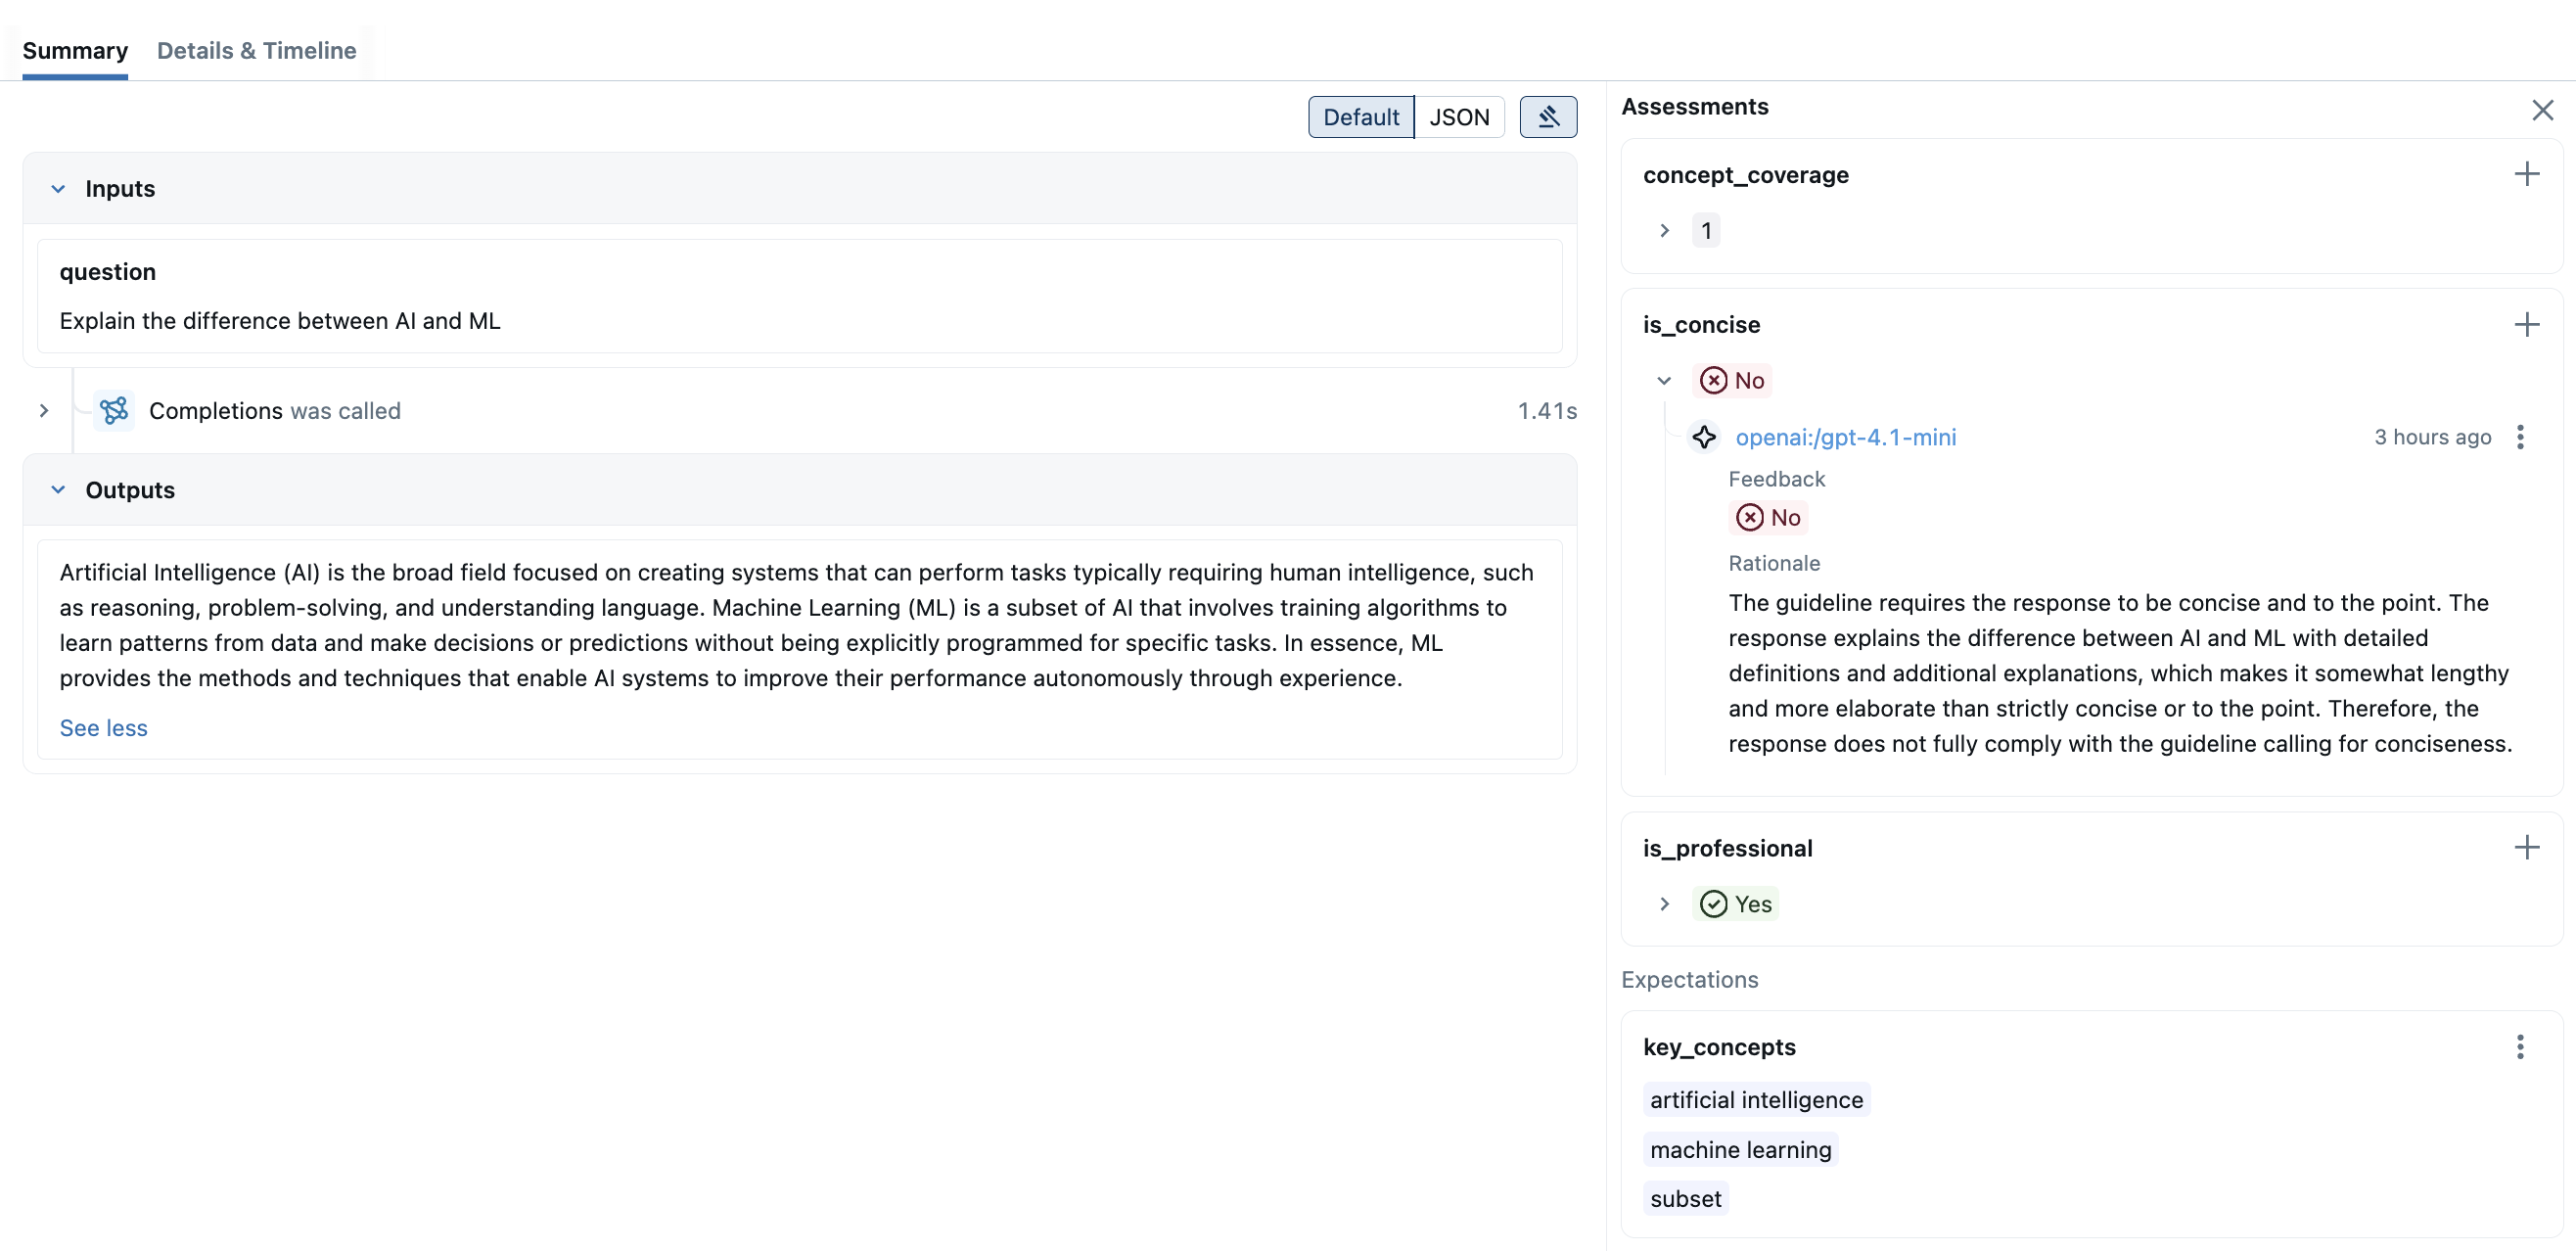
Once the evaluation is done, open the MLflow UI in your browser and navigate to the experiment page. You should see MLflow creates a new Run and logs the evaluation results.

By clicking on the each row in the result, you can open the trace and see the detailed score and rationale.
Iterating on Prompts
The prompt evaluation is an iterative process. You can register a new prompt version, run the same eval again, and compare the evaluation results. The prompt registry keep track of the version changes and lineage between the prompt versions and evaluation results.
# Define V2 prompt template
PROMPT_V2 = [
    {
        "role": "system",
        "content": "You are a helpful assistant. Answer the following question in three sentences.",
    },
    {"role": "user", "content": "Question: {{question}}"},
]

mlflow.genai.register_prompt(name="qa_prompt", template=PROMPT_V2)

# Run the same evaluation again.
# MLflow automatically loads the latest prompt template via the `@latest` alias.
mlflow.genai.evaluate(
    data=eval_dataset,
    predict_fn=predict_fn,
    scorers=[is_concise, is_professional, concept_coverage],
)
Compare Evaluation Results
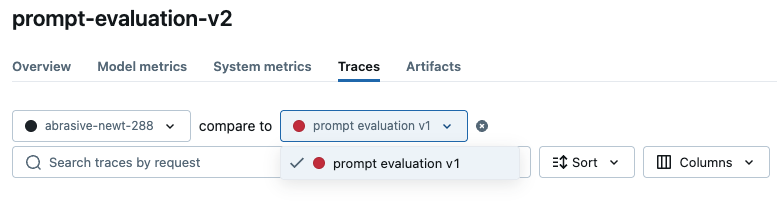
Once you have multiple evaluation runs, you can compare the result side-by-side to analyze the performance changes. To see the comparison view, open the evaluation result page for one of the runs, and pick another run to compare from the dropdown on the top.
To see the comparison view, open the evaluation result page for one of the runs, and pick another run to compare from the dropdown on the top.
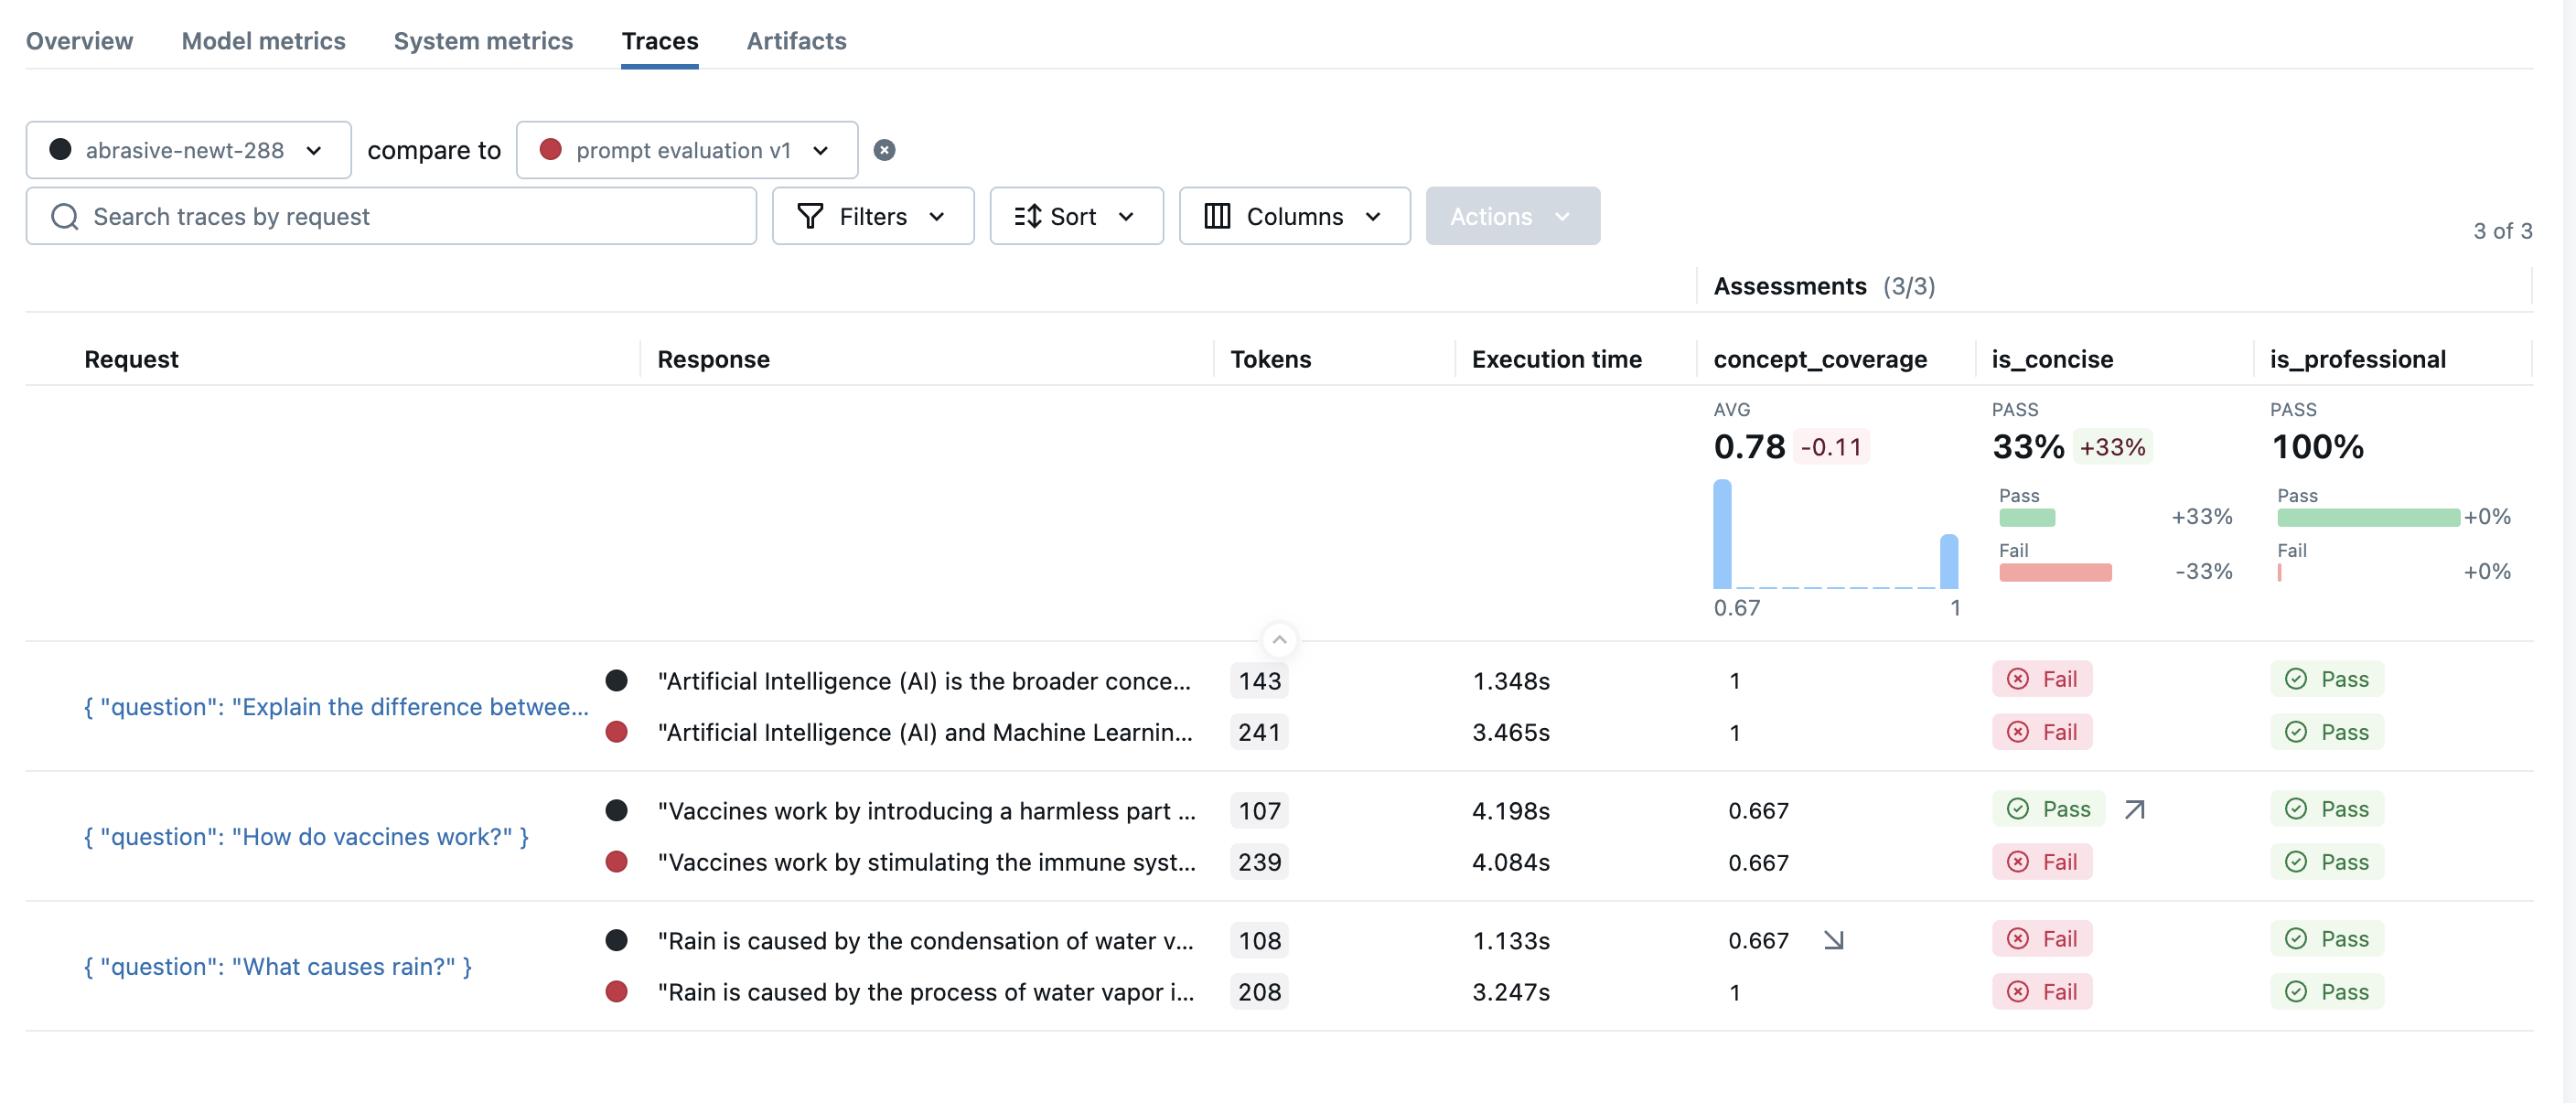
MLflow will load the evaluation results for the two runs and display the comparison view. In this example, you can see the overall concise scorer is improved 33%, but the concept coverage is dropped 11%. The little arrow ↗️/↘️ in each row indicates where the change is coming from.
Next steps
Customize Scorers
Build specialized evaluation metrics for your specific use cases and requirements.
Evaluate Agents
Evaluate complex AI agents with tool calling and multi-step workflows.
Optimize Prompts
Use automated optimization techniques to systematically improve your prompts.