Evaluating Agents
AI Agents are an emerging pattern of LLM applications that can use tools, make decisions, and execute multi-step workflows. However, evaluating the performance of those complex agents is challenging. MLflow provides a powerful toolkit to systematically evaluate the agent behavior precisely using traces and scorers.
Workflow
Build your agent
Create an AI agent with tools, instructions, and capabilities for your specific use case.
Create evaluation dataset
Design test cases with inputs and expectations for both outputs and agent behaviors like tool usage.
Define agent-specific scorers
Create scorers that evaluate multi-step agent behaviors using traces.
Run evaluation
Execute the evaluation and analyze both final outputs and intermediate agent behaviors in MLflow UI.
Example: Evaluating a Tool-Calling Agent
Prerequisites
First, install the required packages by running the following command:
pip install --upgrade 'mlflow[genai]>=3.3' openai
MLflow stores evaluation results in a tracking server. Connect your local environment to the tracking server by one of the following methods.
- Local (uv)
- Local (pip)
- Local (docker)
Install the Python package manager uv
(that will also install uvx command to invoke Python tools without installing them).
Start a MLflow server locally.
uvx mlflow server
Python Environment: Python 3.10+
Install the mlflow Python package via pip and start a MLflow server locally.
pip install --upgrade 'mlflow[genai]'
mlflow server
MLflow provides a Docker Compose file to start a local MLflow server with a PostgreSQL database and a MinIO server.
git clone --depth 1 --filter=blob:none --sparse https://github.com/mlflow/mlflow.git
cd mlflow
git sparse-checkout set docker-compose
cd docker-compose
cp .env.dev.example .env
docker compose up -d
Refer to the instruction for more details (e.g., overriding the default environment variables).
Step 1: Build an agent
Create a math agent that can use tools to answer questions. We use OpenAI Agents to build the tool-calling agent in a few lines of code.
from agents import Agent, Runner, function_tool


@function_tool
def add(a: float, b: float) -> float:
    """Adds two numbers."""
    return a + b


@function_tool
def multiply(a: float, b: float) -> float:
    """Multiply two numbers."""
    return a * b


@function_tool
def modular(a: int, b: int) -> int:
    """Modular arithmetic"""
    return a % b


agent = Agent(
    name="Math Agent",
    instructions=(
        "You will be given a math question. Calculate the answer using the given calculator tools. "
        "Return the final number only as an integer."
    ),
    tools=[add, multiply, modular],
)
Make sure you can run the agent locally.
from agents import Runner

result = await Runner.run(agent, "What is 15% of 240?")
print(result.final_output)
# 36
Lastly, let's wrap it in a function that MLflow can call. Note that MLflow runs each prediction in a threadpool, so using a synchronous function does not slow down the evaluation.
from openai import OpenAI

# If you are using Jupyter Notebook, you need to apply nest_asyncio.
# import nest_asyncio
# nest_asyncio.apply()


def predict_fn(question: str) -> str:
    return Runner.run_sync(agent, question).final_output
Async Functions are Supported!
If your agent library provides an async API, you can use it directly without converting to sync. MLflow automatically detects and handles async functions:
async def predict_fn(question: str) -> str:
    result = await Runner.run(agent, question)
    return result.final_output


mlflow.genai.evaluate(
    data=eval_dataset, predict_fn=predict_fn, scorers=[exact_match, uses_correct_tools]
)
By default, async functions have a 5-minute timeout. Configure this using the MLFLOW_GENAI_EVAL_ASYNC_TIMEOUT environment variable:
export MLFLOW_GENAI_EVAL_ASYNC_TIMEOUT=600 # 10 minutes
Step 2: Create evaluation dataset
Design test cases as a list of dictionaries, each with an inputs, expectations, and an optional tags field.
eval_dataset = [
    {
        "inputs": {"task": "What is 15% of 240?"},
        "expectations": {"answer": 36},
        "tags": {"topic": "math"},
    },
    {
        "inputs": {
            "task": "I have 8 cookies and 3 friends. How many more cookies should I buy to share equally?"
        },
        "expectations": {"answer": 1},
        "tags": {"topic": "math"},
    },
    {
        "inputs": {
            "task": "I bought 2 shares of stock at $100 each. It's now worth $150. How much profit did I make?"
        },
        "expectations": {"answer": 100},
        "tags": {"topic": "math"},
    },
]
Step 3: Define scorers
We'll define a custom scorer to evaluate the correctness of the final output.
from mlflow.genai import scorer


@scorer
def exact_match(outputs, expectations) -> bool:
    return int(outputs) == expectations["answer"]
MLflow provides built-in scorers for evaluating agent tool usage:
- ToolCallCorrectness: Evaluates if tool calls and arguments are correct for the user query
- ToolCallEfficiency: Evaluates if tool calls are efficient without redundancy
These scorers automatically analyze traces to assess tool usage patterns. See the Built-in Judges guide for more details.
For custom evaluation patterns, you can create your own scorers that parse traces. See the Custom Scorers guide.
Step 4: Run the evaluation
Now we are ready to run the evaluation!
from mlflow.genai.scorers import ToolCallCorrectness, ToolCallEfficiency

results = mlflow.genai.evaluate(
    data=eval_dataset,
    predict_fn=predict_fn,
    scorers=[
        exact_match,
        ToolCallCorrectness(),
        ToolCallEfficiency(),
    ],
)
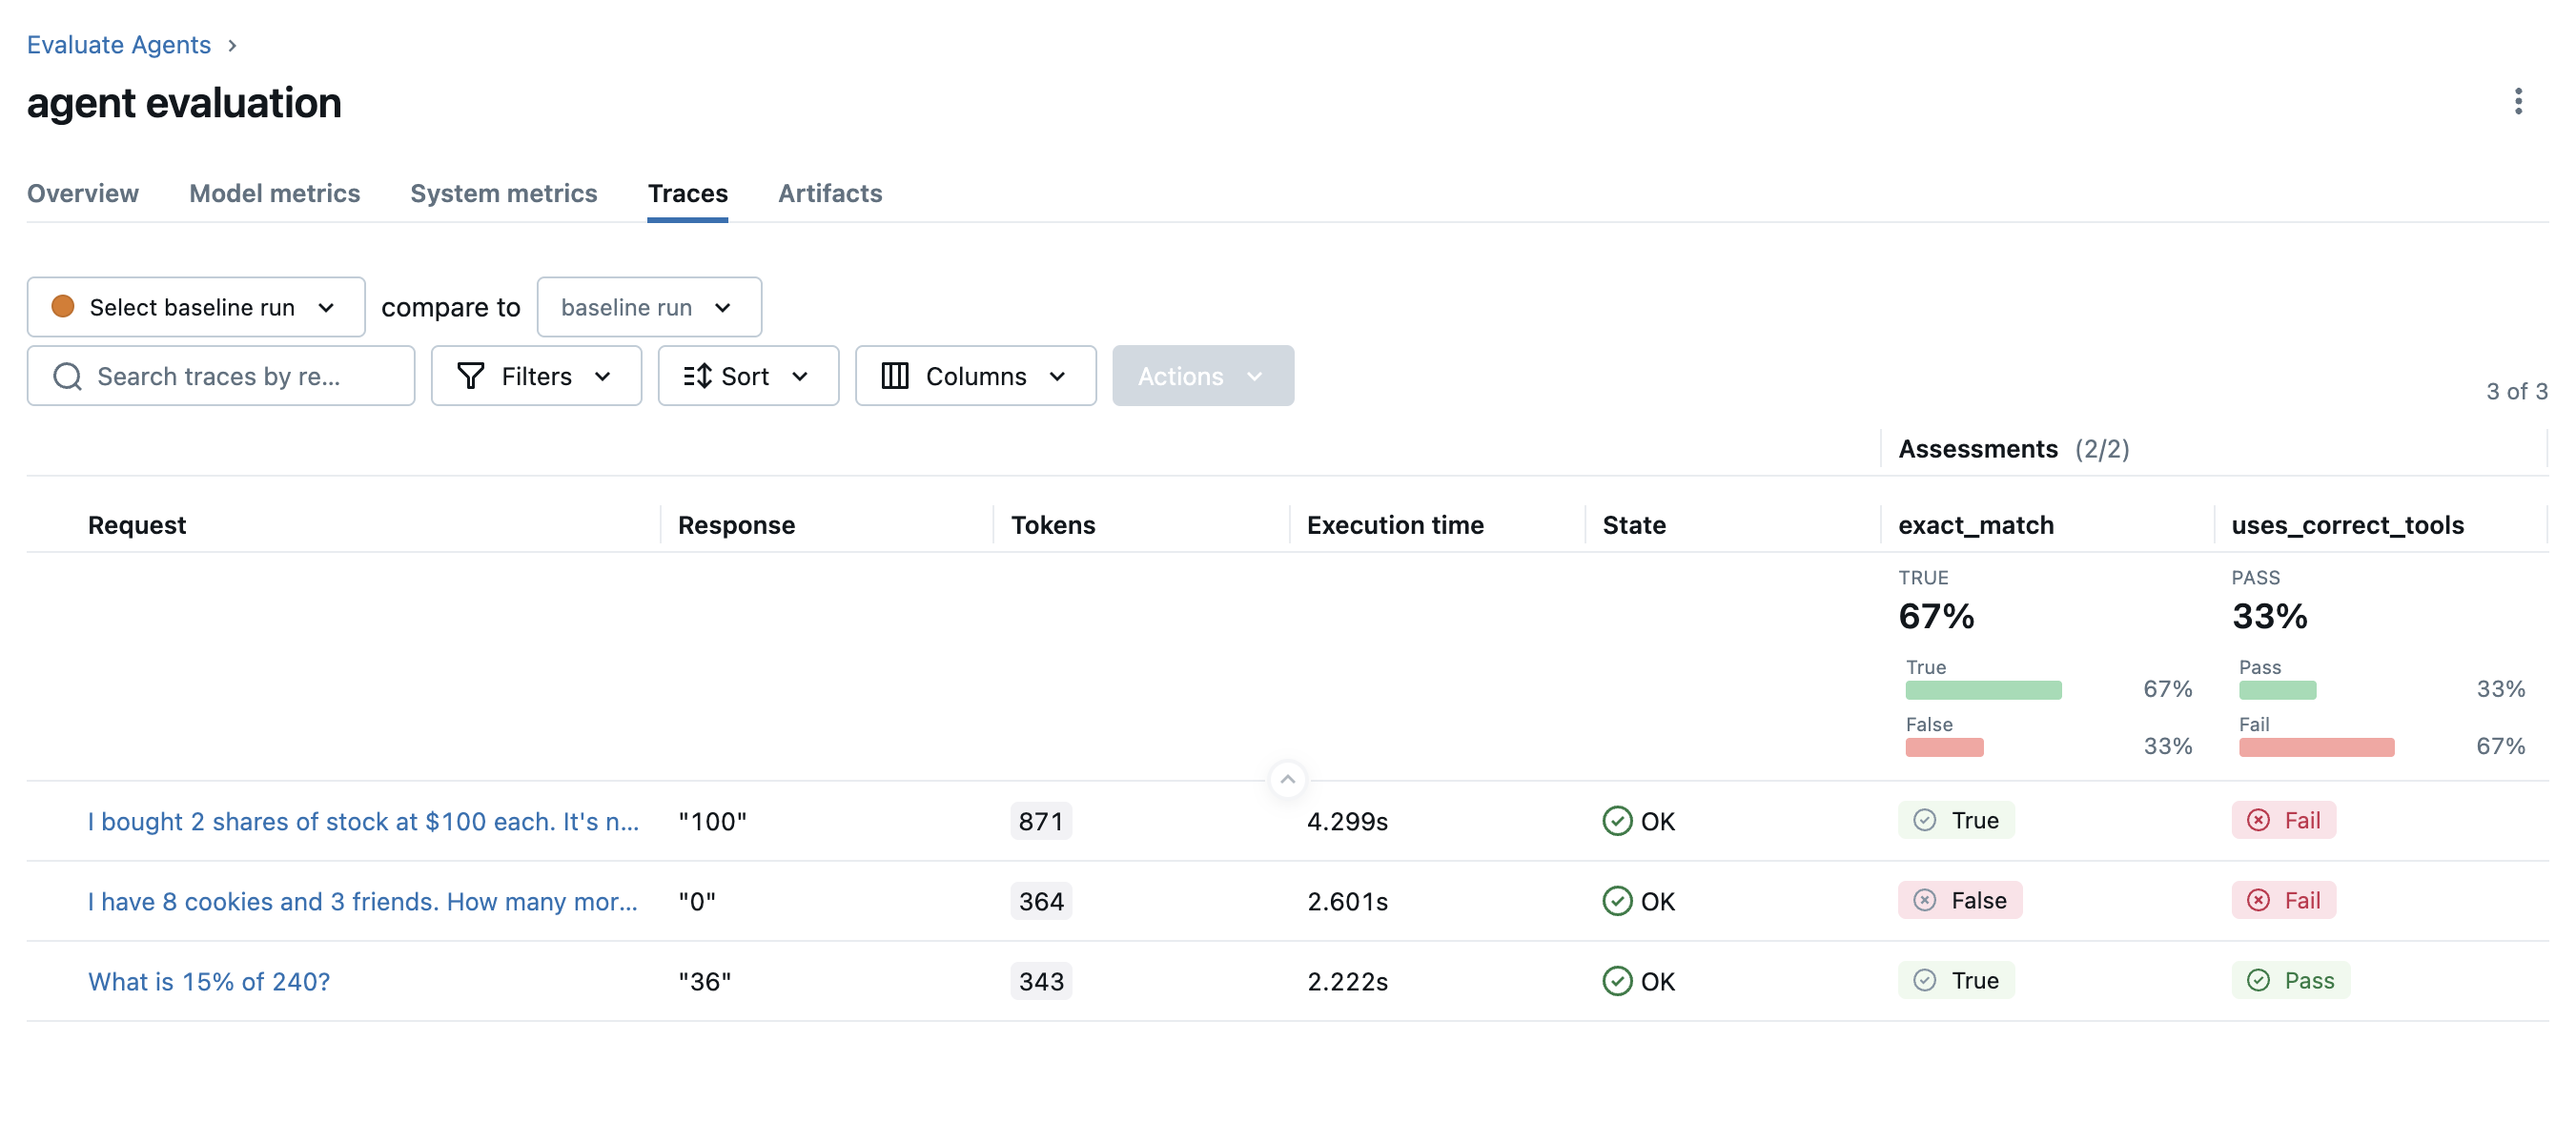
Once the evaluation is done, open the MLflow UI in your browser and navigate to the experiment page. You should see MLflow creates a new Run and logs the evaluation results.
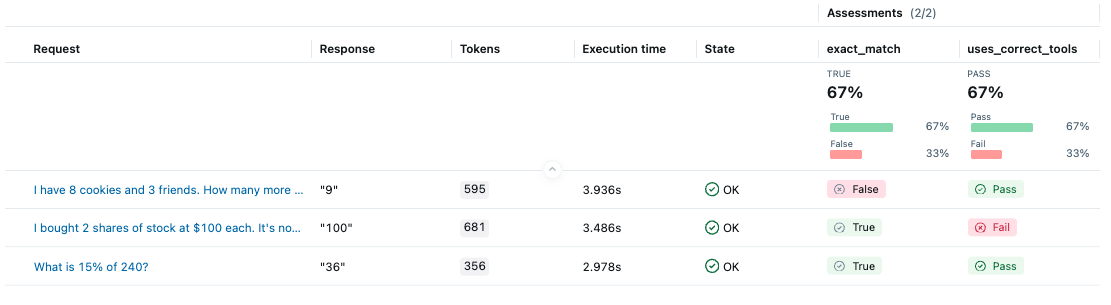
It seems the agent does not call tools in the correct order for the second test case. Let's click on the row to open the trace and inspect what happened under the hood.
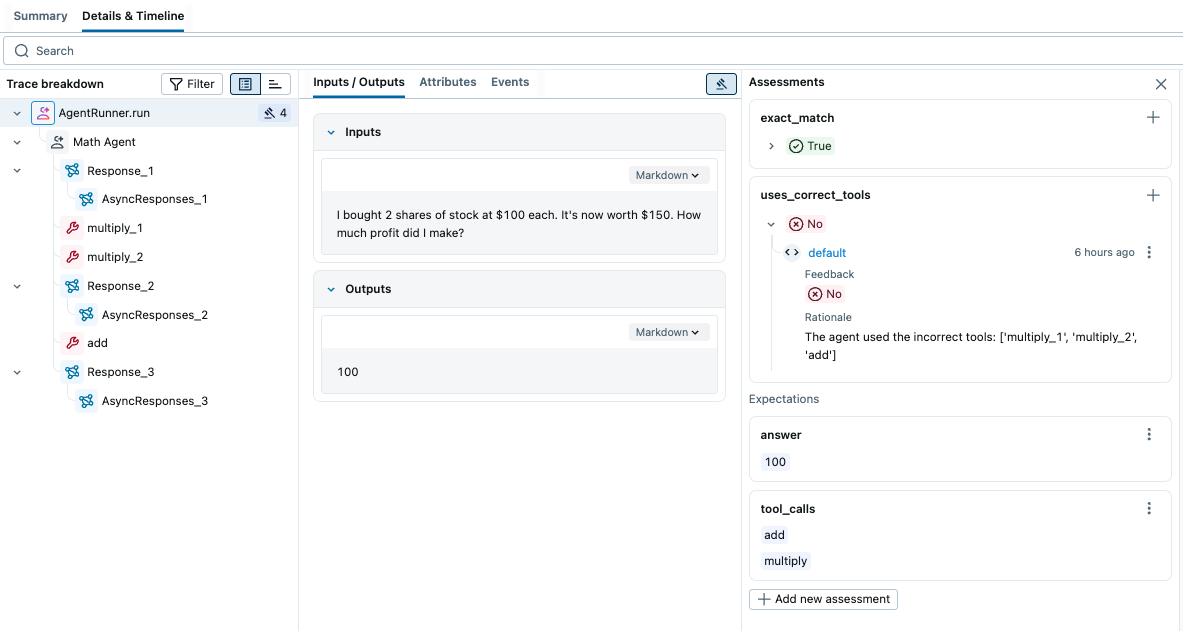
By looking at the trace, we can figure out the agent computes the answer in three steps (1) compute 100 _ 2 (2) compute 150 _ 2 (3) subtract the two results. However, the more effective way is (1) subtract 100 from 150 (2) multiply the result by 2. In the next version, we can update the system instruction to use tools in a more effective way.
Configure parallelization
Running a complex agent can take a long time. MLflow by default uses background threadpool to speed up the evaluation process. You can configure the number of workers to use by setting the MLFLOW_GENAI_EVAL_MAX_WORKERS environment variable.
export MLFLOW_GENAI_EVAL_MAX_WORKERS=10
Evaluating MLflow Models
In MLflow 2.x, you can pass the model URI directly to the model argument of the legacy mlflow.evaluate() API (deprecated). The new evaluation API in MLflow 3.x still supports evaluating MLflow Models, but the workflow is slightly different.
import mlflow

# Load the model **outside** the prediction function.
model = mlflow.pyfunc.load_model("models:/math_agent/1")


# Wrap the model in a function that MLflow can call.
def predict_fn(question: str) -> str:
    return model.predict(question)


# Run the evaluation as usual.
mlflow.genai.evaluate(
    data=eval_dataset, predict_fn=predict_fn, scorers=[exact_match, uses_correct_tools]
)
Evaluating Multi-Turn Agents
The examples above evaluate single-turn interactions where each input produces one response. For conversational agents that handle multi-turn dialogues, you can use conversation simulation to generate and evaluate complete conversations:
from openai import OpenAI
from mlflow.genai.simulators import ConversationSimulator
from mlflow.genai.scorers import ConversationCompleteness, Safety

client = OpenAI()


# Define conversation scenarios to test
simulator = ConversationSimulator(
    test_cases=[
        {"goal": "Get help calculating compound interest"},
        {"goal": "Debug why a calculation is wrong", "persona": "Frustrated user"},
    ],
    max_turns=5,
)


# The predict function follows the Chat Completions API format
def predict_fn(input: list[dict], **kwargs):
    # input is a list of message dicts with "role" and "content" keys
    response = client.chat.completions.create(
        model="gpt-5-mini",
        messages=input,
    )
    return response.choices[0].message.content


# Evaluate with both conversation-level and turn-level scorers
results = mlflow.genai.evaluate(
    data=simulator,
    predict_fn=predict_fn,
    scorers=[
        ConversationCompleteness(),  # Conversation-level
        Safety(),  # Applied to each turn
    ],
)
For complete documentation on multi-turn evaluation, see Evaluate Conversations and Conversation Simulation.
Next steps
Customize Scorers
Build advanced evaluation criteria and metrics specifically designed for agent behaviors and tool usage patterns.
Evaluate Production Traces
Analyze real agent executions in production environments to understand performance and identify improvement opportunities.
Evaluate Conversations
Assess multi-turn conversations with specialized scorers for dialogue quality and user satisfaction.