Deploying MLflow to AWS
MLflow core components include:
- MLflow server: This is the Python backend for experiment tracking, model registry management, tracing for LLM observability, job scheduling, and AI Gateway endpoints.
- Backend store: The database in which entity metadata (e.g. trace info, experiment tracking metadata) is stored.
- Artifact store: Blob storage for larger pieces of persisted data (e.g. model weights, trace span data).
This guide walks you through deploying the MLflow server to Amazon ECS (Elastic Container Service), the backend store to Amazon RDS (PostgreSQL), and the artifact store to Amazon S3. The guide also covers IAM roles, VPC subnets, security groups, and ALB (Application Load Balancer) settings. Once deployment is complete, you can access the MLflow web UI through an AWS application URL like https://ml-<unique-service-id>.ecs.<aws-region>.on.aws, and your MLflow client code can connect to the MLflow server by setting the tracking URI to this URL.
The overall deployment architecture is as follows:
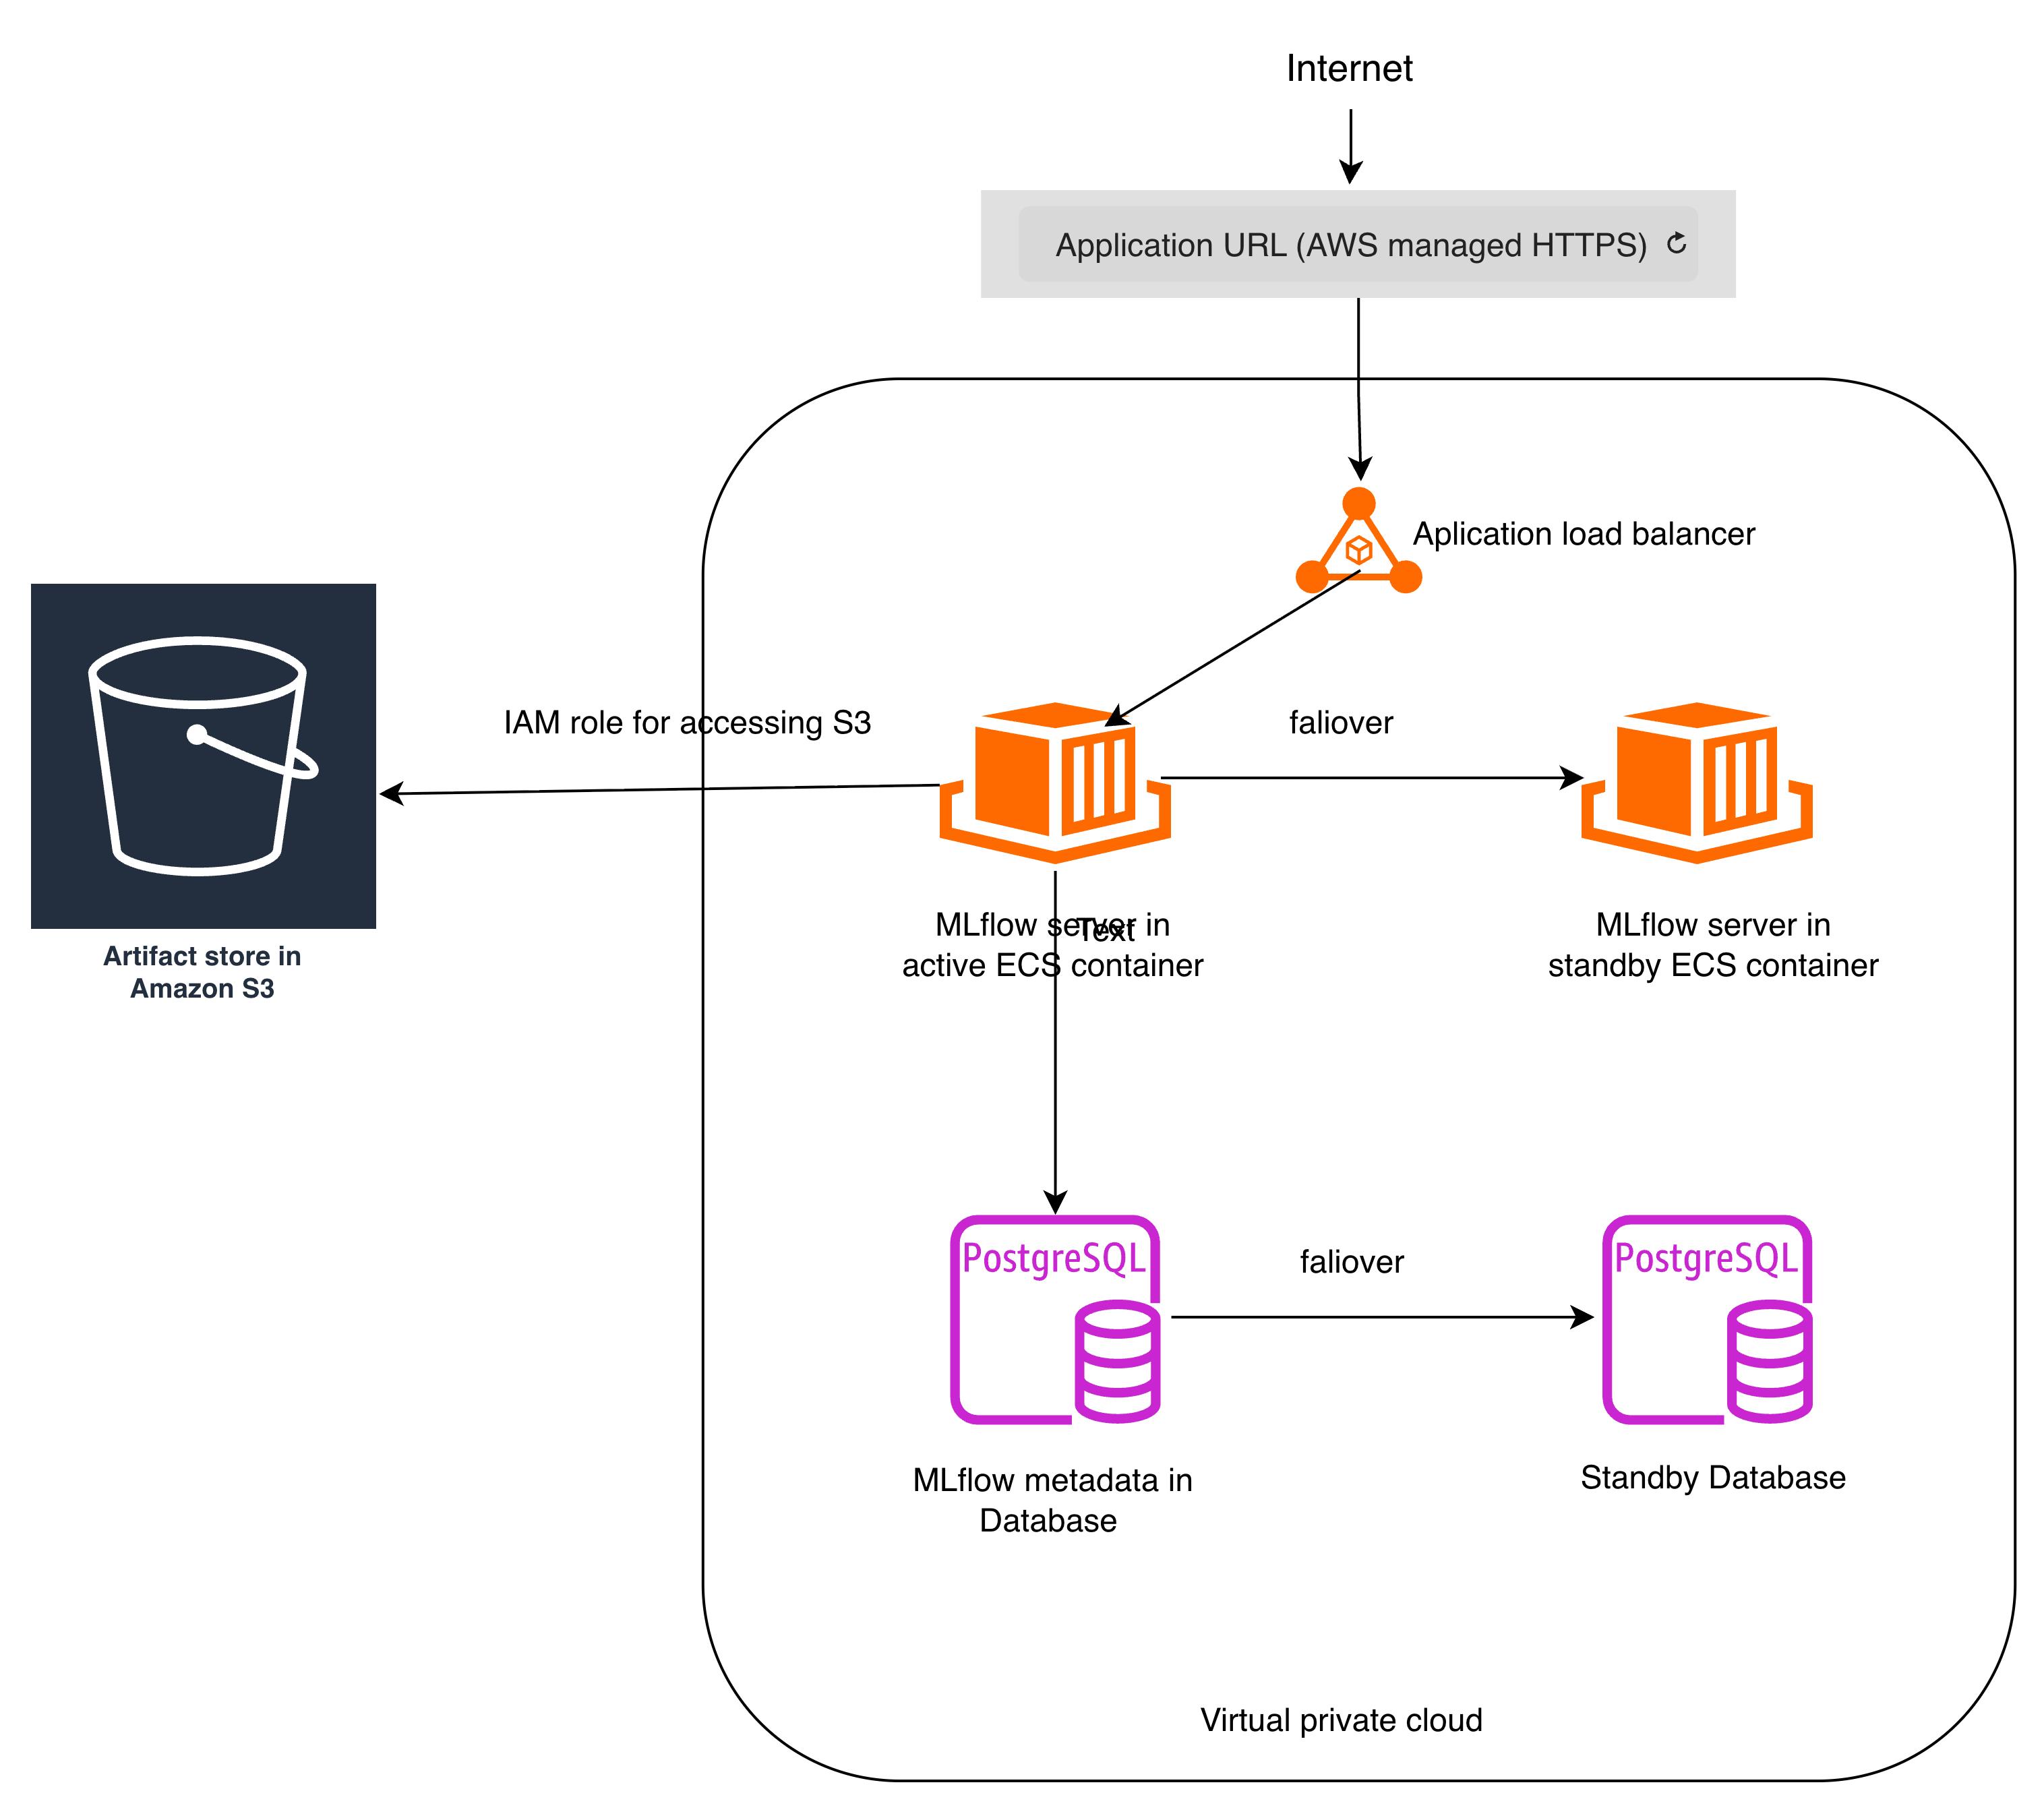
The deployment architecture has a couple of advantages:
-
High Availability
- The Amazon S3 provides built-in multi-AZ durability and extremely high availability for MLflow artifact storage.
- Amazon RDS supports automatic failover to a standby instance in a different Availability Zone, minimizing database downtime for MLflow backend store.
- Amazon ECS on Fargate automatically restarts failed tasks and can redeploy them in another Availability Zone if needed, minimizing MLflow service downtime.
-
Security by design
- Public traffic is encrypted using HTTPS, ensuring secure communication between clients and the application endpoint.
- IAM Roles: The S3 bucket blocks all public access and MLflow server uses IAM role for secure access to the S3 bucket.
- VPC Isolation and VPC Security Groups: Application containers run in private subnets, preventing direct exposure to the public internet, only the load balancer can access the ECS task that runs MLflow server, there is no unnecessary inbound exposure.
- The architecture can integrate with MLflow authentication configurations.
-
Operational Simplicity
- Serverless Compute (ECS on Fargate), no EC2 instances to manage, patch, or scale manually.
- Managed Database (RDS): Automated backups, patching, and failover.
Note that you can also use managed MLflow on AWS SageMaker instead of the self-hosting approach in this guide. The managed MLflow on AWS SageMaker provides a fully integrated, fully managed machine learning tracking and experiment management service.
Step 1: Create S3 bucket
Create a S3 bucket with name like "mlflow-artifacts-123", and block all public access as follows:

MLflow will store large artifacts such as model weight, figures, videos, within the specified S3 bucket.
Step 2: Create RDS instance
Create an RDS instance of PostgreSQL type, set credentials management to "Self managed", and set master username / password. Once creation completes, you can view the RDS instance endpoint information as follows:
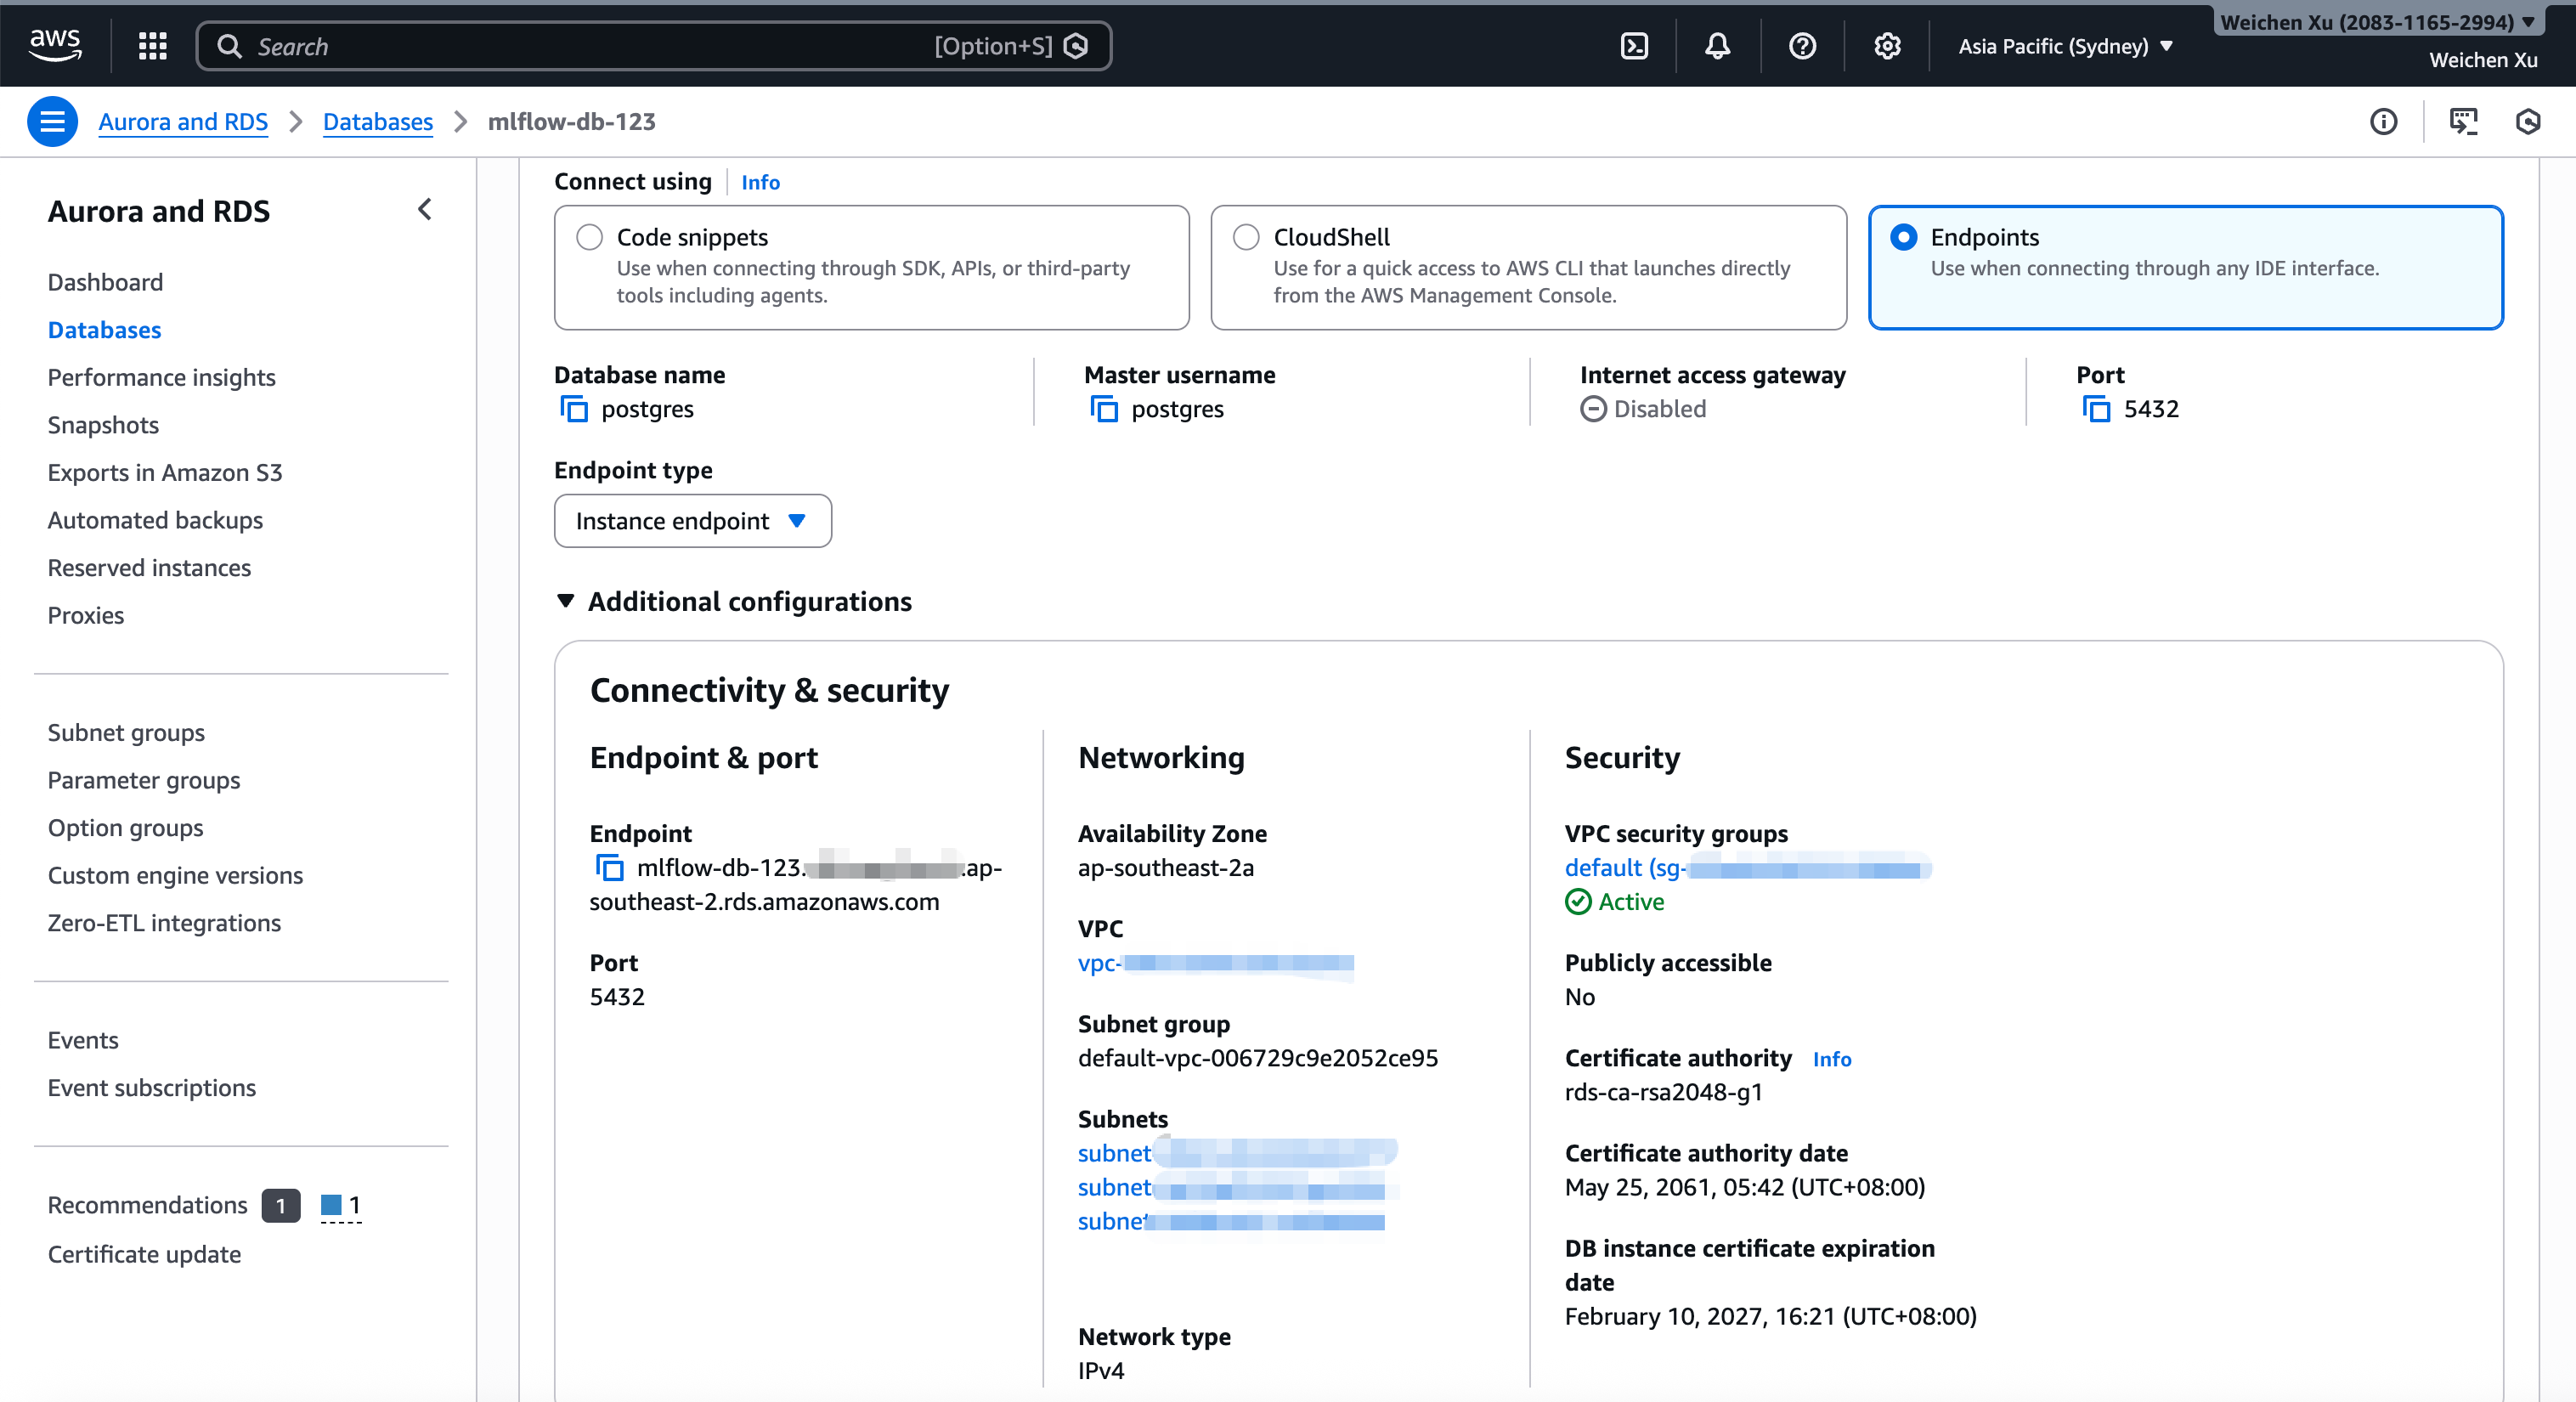
If you need to set up a standby database instance for high availability, go to "Availability & durability -> Multi-AZ deployment" panel and select "Create a standby instance".
Then you can construct the database URI like postgresql://<username>:<password>@<endpoint>:5432/<database-name>. The database URI is used by MLflow server.
MLflow will store metadata of experiments / runs / logged models / registered models / traces / jobs / gateway endpoints in the database.
Step 3: Create IAM role for MLflow service to access the S3 bucket
The S3 bucket that is created in the first step blocks all public access. Create an IAM role "mlflow-task-role" with an inline policy as follows:
{
    "Version": "2012-10-17",
    "Statement": [
        {
            "Sid": "MLflowArtifacts",
            "Effect": "Allow",
            "Action": [
                "s3:PutObject",
                "s3:GetObject",
                "s3:DeleteObject",
                "s3:ListBucket",
                "s3:AbortMultipartUpload"
            ],
            "Resource": [
                "arn:aws:s3:::<the name of s3 bucket for mlflow artifacts store>",
                "arn:aws:s3:::<the name of s3 bucket for mlflow artifacts store>/*"
            ]
        }
    ]
}
Step 4: Create ECS (Elastic Container Service) to host the MLflow server
Create ECS (Elastic Container Service) to host the MLflow web server and the UI. Choose "Express mode" to configure most settings including VPC and ALB automatically, but you need to fill the following settings correctly:
- Set the "Image URI" to a certain version MLflow image, e.g.
ghcr.io/mlflow/mlflow:v3.10.0-full. You can find available MLflow images in this page. - Set the "Container port" to 5000, this is the port of the MLflow server running inside the container.
- Set the "Health check" path to "/health"
- Set the "Command" to
bash,-c,mlflow server --backend-store-uri {database-URL} --artifacts-destination s3://{s3-bucket-name}/ --host 0.0.0.0 --port 5000 --disable-security-middleware, note that we disable the security middleware because the MLflow service is protected behind the Amazon ALB Security group + VPC subnet, and the ECS express mode will generate the default ALB / VPC settings automatically. - Set the "Task role" to the "mlflow-task-role" that is created above.
- Set the compute resources used by the MLflow server (CPU / memory etc) properly.
- Set both of "Minimum number of tasks" and "Maximum number of tasks" to 1 so that the desired steady-state is a single MLflow server task. ECS will attempt to keep one task running and will automatically start a replacement if the running task crashes.
After creation, you can view the ECS express service overview page as follows:
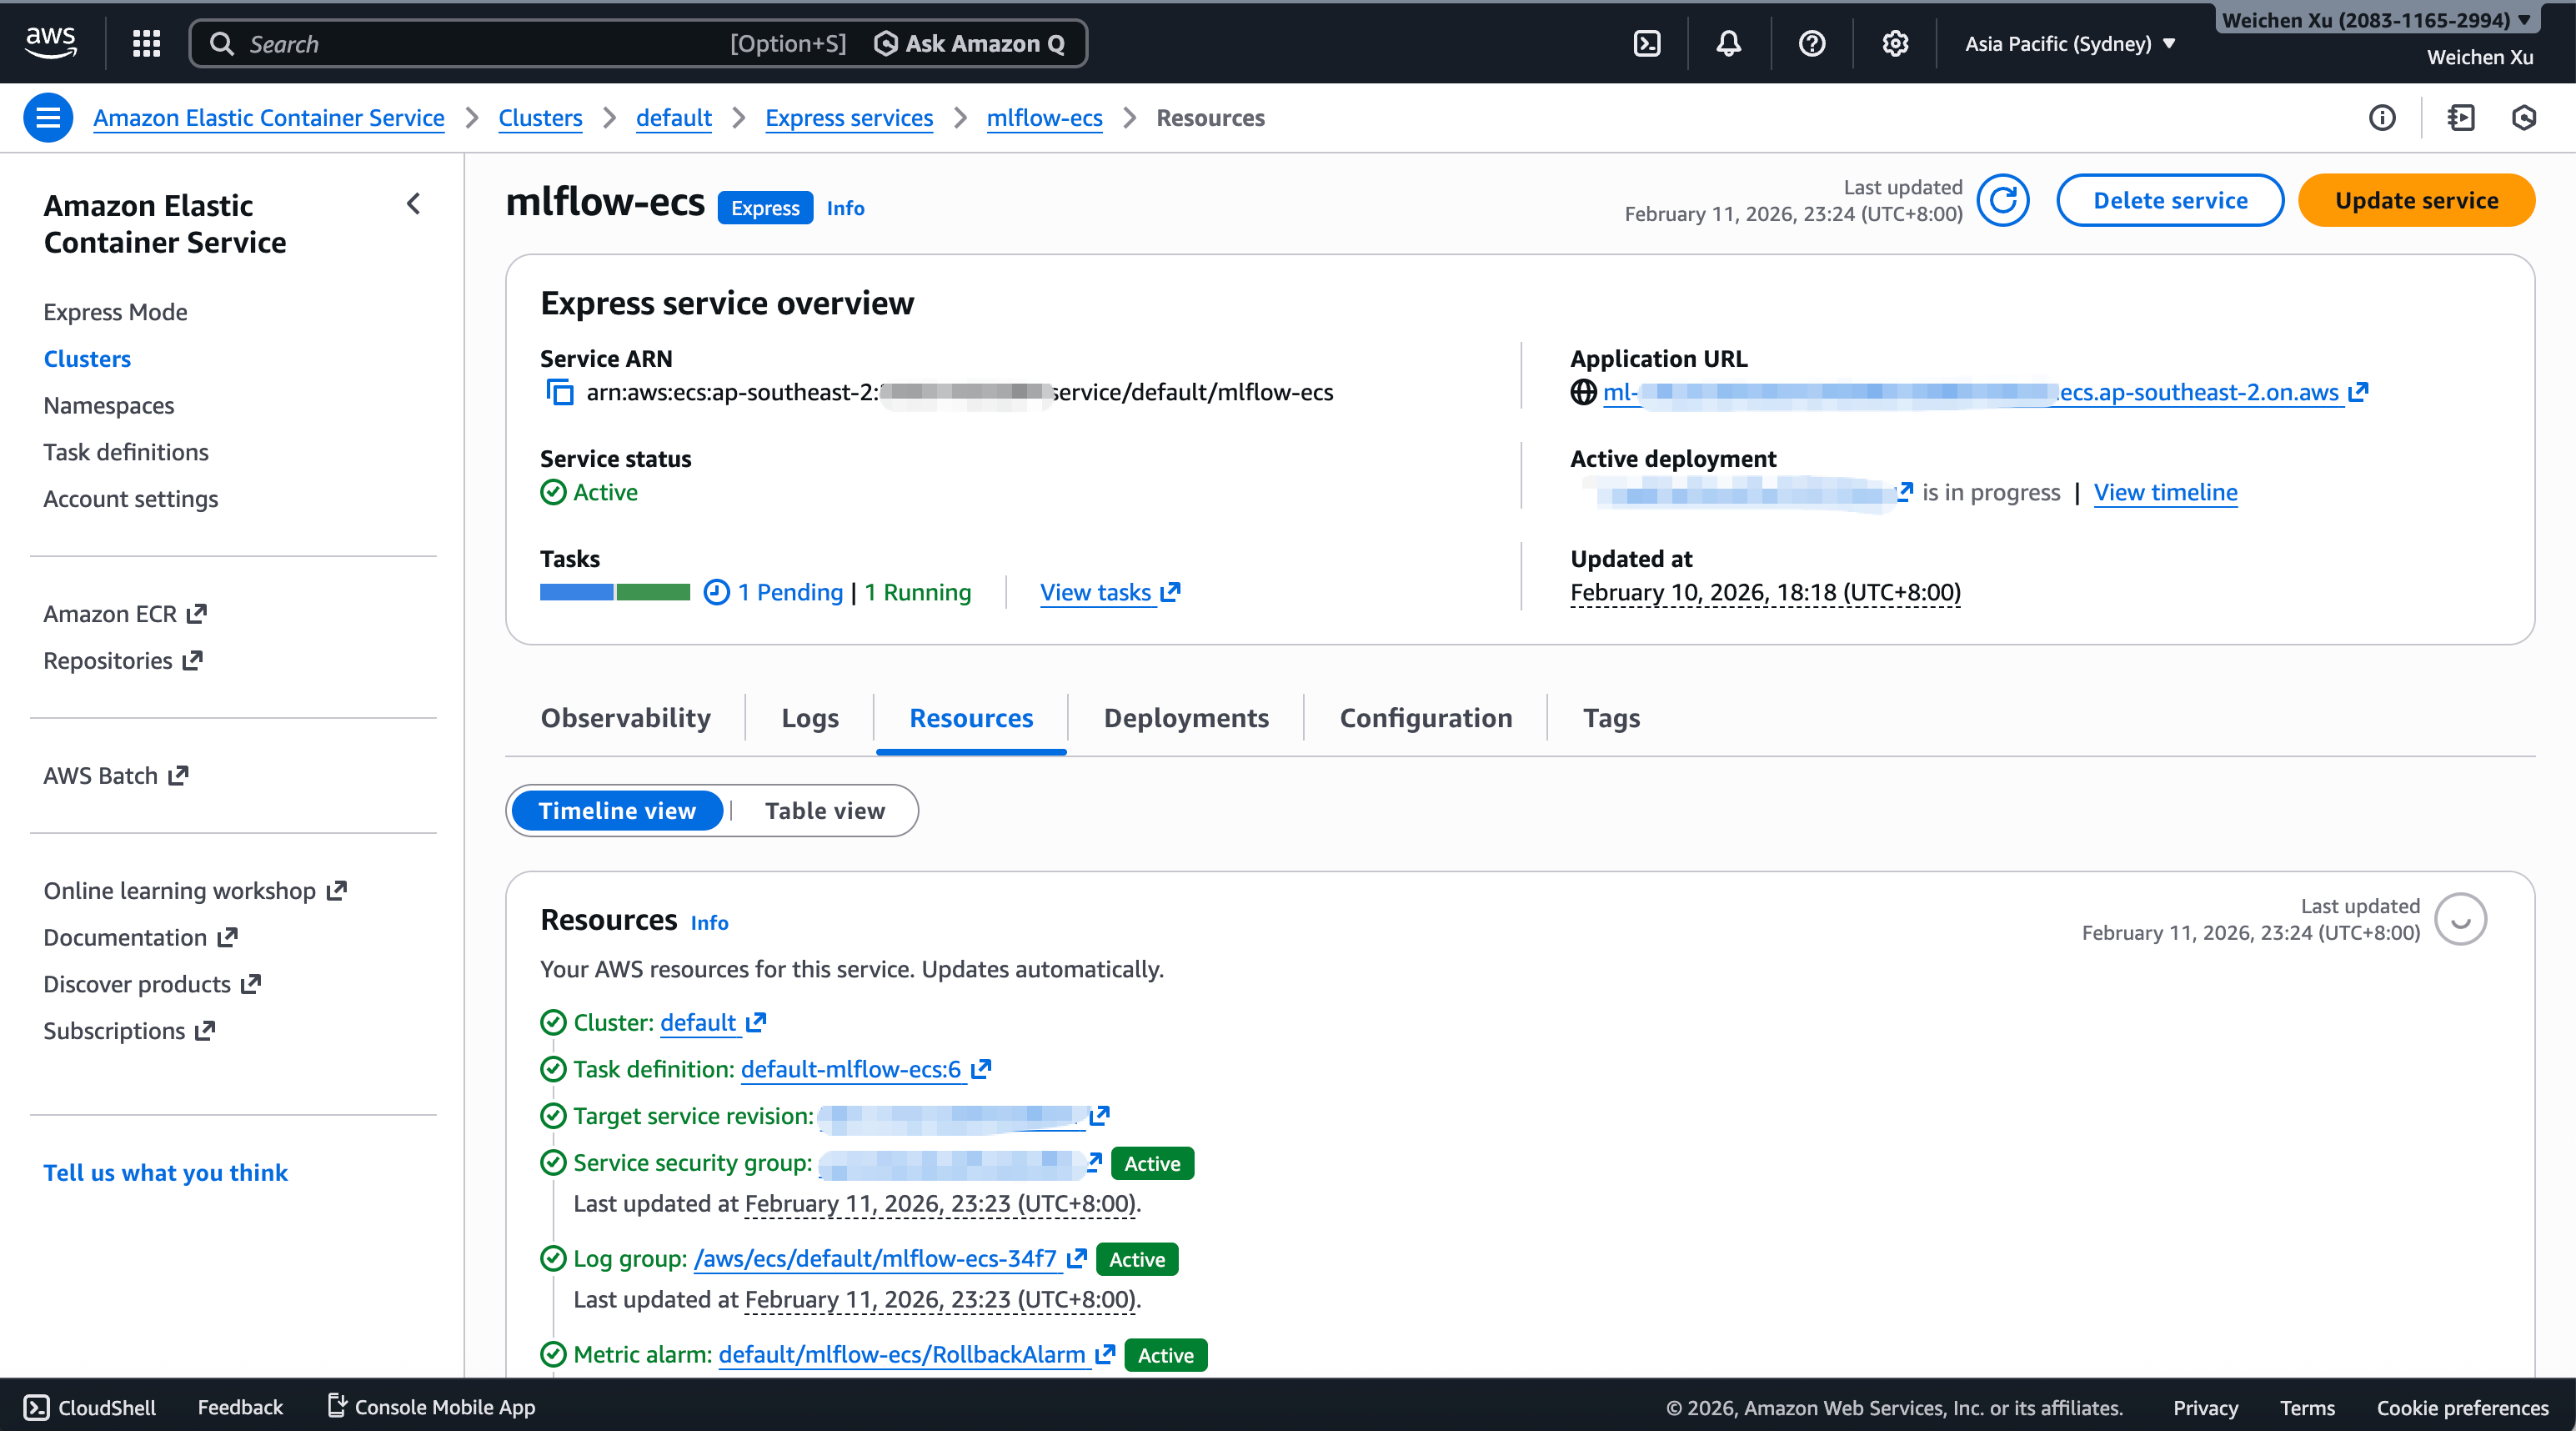
The "Application URL" on the overview page is the MLflow service URL that you can access from public network.
Integration with MLflow authentication
MLflow supports basic authentication and authentication with OIDC plugin, the 2 kinds of authentication settings require:
- Additional pip package installation: Inject it as a
pip installcommand into the "Command" setting. - Additional environment variable settings: Set them as the environment variables of the ECS service.
- Additional mlflow server CLI options: Append them in the "Command" setting.
Step 5: Validate the deployment
Use MLflow demo CLI to validate the deployment. Run the command from your own laptop as follows:
mlflow demo --tracking-uri <ECS-application-URL>
then open the application URL in your browser, view the experiment with name "MLflow Demo", and explore GenAI features like traces, evaluation runs, prompt management etc.