Tracing Mastra
MLflow Tracing provides automatic tracing capability for Mastra, a flexible and modular AI agents framework developed by Mastra. MLflow supports tracing for Mastra through the OpenTelemetry integration.
Step 1: Create a new Mastra agent
npm create mastra@latest
npm install @mastra/otel-exporter
This will create a new TypeScript project with a simple tool calling agent implementation.
Step 2: Start the MLflow Tracking Server
Start the MLflow Tracking Server with a SQL-based backend store:
mlflow server --backend-store-uri sqlite:///mlflow.db --port 5000
This example uses SQLite as the backend store. To use other types of SQL databases such as PostgreSQL, MySQL, and MSSQL, change the store URI as described in the backend store documentation. OpenTelemetry ingestion is not supported with file-based backend stores.
Step 3: Configure OpenTelemetry
Configure the OpenTelemetry tracer in your Mastra agent to export traces to the MLflow Tracking Server endpoint.
Open the src/mastra/index.ts file and add the observability configuration to the Mastra agent instantiation.
import { OtelExporter } from "@mastra/otel-exporter";

export const mastra = new Mastra({
  workflows: { weatherWorkflow },
  ...

  // Add the following observability configuration to enable OpenTelemetry tracing.
  observability: {
    configs: {
      otel: {
        serviceName: "maestra-app",
        exporters: [new OtelExporter({
          provider: {
            custom: {
              // Specify tracking server URI with the `/v1/traces` path.
              endpoint: "http://localhost:5000/v1/traces",
              // Set the MLflow experiment ID in the header.
              headers: { "x-mlflow-experiment-id": "<your-experiment-id>"},
              // MLflow support HTTP/Protobuf protocol.
              protocol: "http/protobuf"
            }
          }
        })]
      }
    }
  },
});
Step 4: Run the Agent
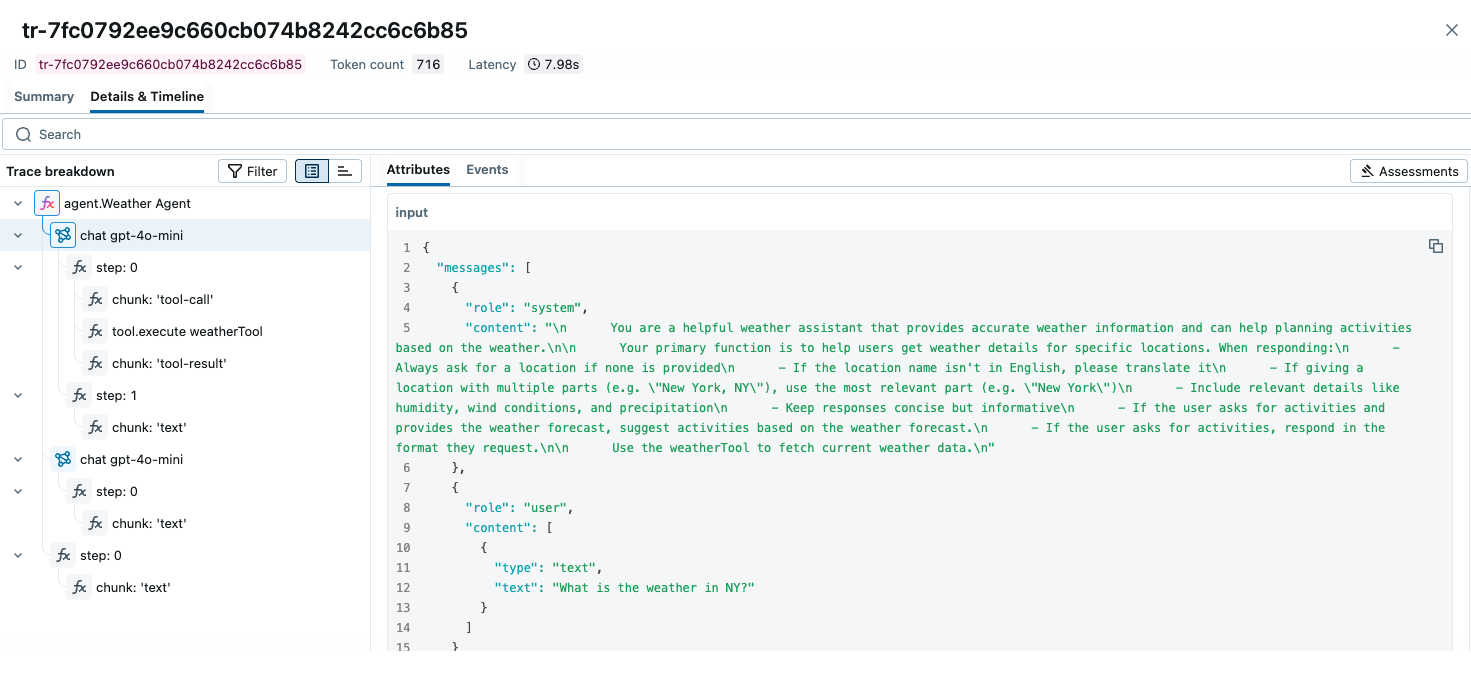
Start the Mastra agent with the npm run dev command. The playground URL will be displayed in the console.

After chatting with the agent, open the MLflow UI at http://localhost:5000 and navigate to the experiment to see the traces like the screenshot at the top of this page.
Combine with the MLflow Tracing SDK
Since this integration is built on OpenTelemetry, you can combine the automatically generated traces with the MLflow Tracing SDK (@mlflow/core) to add custom spans, set tags, and update trace metadata within the same trace.
import { init, withSpan } from "@mlflow/core";

// Initialize MLflow SDK - sets up the OTel provider to capture all spans
init({
  trackingUri: "http://localhost:5000",
  experimentId: "<your-experiment-id>",
});

// Add custom MLflow spans alongside the auto-generated Mastra traces
const result = await withSpan(
  { name: "custom_step", inputs: { query: "test" } },
  async (span) => {
    // your application logic here
    return { result: "success" };
  }
);
For detailed instructions and examples, see Combining the OpenTelemetry SDK and the MLflow Tracing SDK.
Next Steps
- Evaluate the Agent: Learn how to evaluate the agent's performance.
- Manage Prompts: Learn how to manage prompts for the agent.
- Automatic Agent Optimization: Learn how to automatically optimize the agent end-to-end with state-of-the-art optimization algorithms.